#How to Recover Hidden Files in Android Mobile
Explore tagged Tumblr posts


Text
Mobile Repair: How Professional Technicians Make Your Phone Like New

Introduction Is your phone struggling to perform, with glitches, lags, or damaged hardware? You’re not alone. Many users tolerate underperforming phones, unsure where to turn for reliable help. Relying on DIY solutions or unqualified technicians often makes problems worse. Worse yet, replacing your phone is costly and inconvenient. At PhoneBuzz, we combine expertise with cutting-edge tools to breathe new life into your device, ensuring it functions as well as the day you bought it.
Why Professional Mobile Repair Matters
Comprehensive Diagnostics
Professional technicians go beyond surface issues to uncover root problems.
At PhoneBuzz, our team uses advanced diagnostic equipment to identify both hardware and software faults quickly.
High-Quality Replacement Parts
Using substandard parts can lead to recurring issues or reduced phone performance.
We ensure that all replacement parts at PhoneBuzz meet or exceed manufacturer standards, whether it’s a new screen, battery, or internal component.
Certified Technicians with Experience
Expert technicians are trained to handle the complexities of modern devices, from iPhones to Androids.
At PhoneBuzz, our team is certified to repair phones of all brands, ensuring reliable and lasting solutions.
Warranty for Repairs
Reliable service providers like PhoneBuzz offer warranties for repairs, giving you peace of mind and confidence in the quality of work.
Top Mobile Repairs We Handle at PhoneBuzz
Screen Repairs and Replacements
Cracked screens are not only unsightly but also dangerous and inconvenient.
PhoneBuzz replaces damaged screens with high-quality, durable options that restore touch sensitivity and clarity.
Battery Replacement
Battery issues can cause random shutdowns and overheating.
Replacing your old battery with a new, long-lasting one improves performance and device longevity.
Charging Port Repair
amaged or clogged charging ports lead to connection issues.
PhoneBuzz cleans and repairs ports to ensure seamless charging.
Camera Repairs
Whether it’s a scratched lens or a malfunctioning sensor, our team can restore your phone’s camera to its original quality.
Water Damage Restoration
Accidental spills or full submersion in water can wreak havoc on your device.
PhoneBuzz uses advanced techniques to salvage water-damaged phones and recover critical data.
How PhoneBuzz Stands Out in Mobile Repairs
Fast Turnaround Times
Most repairs are completed within the same day, minimizing your inconvenience
Transparent Pricing
With no hidden fees, PhoneBuzz ensures you know exactly what you’re paying for.
Convenient Locations and Services
Visit our store or opt for our pickup and delivery services for added convenience.
Customer Support
Our friendly team is always available to answer your questions and provide post-repair assistance.
DIY Fixes vs. Professional Repairs: Why the Experts Win
Risk of Further Damage
Attempting DIY repairs can worsen the problem or void your warranty. Professionals have the tools and skills to handle delicate components safely.
Proper Tools and Equipment
Many phone repairs require specialized tools that professionals like PhoneBuzz use to deliver precision repairs.
Cost-Effectiveness in the Long Run
While DIY methods may seem cheaper initially, incorrect repairs can lead to costlier fixes. Professional repairs provide long-lasting solutions, saving you money over time.
Tips to Keep Your Phone in Top Condition
Invest in a Quality Case and Screen Protector
Prevent cracks, scratches, and external damage.
Avoid Overcharging
Overcharging can degrade your battery. Use smart chargers or unplug once fully charged.
Keep Your Software Updated
Software updates enhance security and performance.
Backup Your Data Regularly
Protect your important files in case of unexpected damage.
Clean Ports and Buttons
Use compressed air or a soft brush to remove dirt and lint.
Conclusion Why struggle with a malfunctioning phone when PhoneBuzz offers fast, reliable, and affordable solutions? With our expert team and high-quality repair services, you can enjoy a like-new device without breaking the bank. Visit PhoneBuzz today for all your mobile repair needs!
0 notes
Link
#how to recover hidden files in android mobile#how to find hidden files on android phone#mi hidden files deleted automatically
0 notes
Link
#what are the reasons for files get hidden in android?#Recover Android Data Without USB Debugging#How to Recover Hidden Files in Android Mobile Automatically#Recover hidden files by using the gallery#How to Recover Hidden Files in Android Mobile#how to find hidden files on android phone#hidden files android gallery#how to access inaccessible files on android#how to find hidden pictures on android phone#how to recover deleted hidden photos on android#how to show hidden files in realme 3 pro#how to transfer hidden files from android to pc#how to find hidden things on android phone#how to recover hidden files in android phone#how to enable hidden files in android phone#how to recover deleted hidden files in android mobile#Android Data Recovery Software
0 notes
Text
Download Facebook Password Sniper V1.2 For Android
Facebook password sniper 2014 v1.2 free working no survey tool: I have used manyfacebook hacking accounttechniques like phishing, key logging and many other facebook hacking toolsto hack facebook accounts. Alass! Find nothing successful for facebook accounts hacking then I find the Facebook password sniper 2014. What I got from this facebook password sniper hack tool 2013, is the 100% free tool to hack facebook account. Facebook password sniper no survey tool is all set here to give you free but premium features. Serato dj free download for android. Say yes! If anyone ask you to hack facebook account.
Download Facebook Password Sniper V1.2 For Android Download
Download Facebook Password Sniper V1.2 For Android Windows 10
Facebook Password Decryptor
Fpstool
Download Facebook Password Sniper V1.2 For Android Windows 7
Apr 04, 2018 With daily fresh proxy and maintenance, we are trying to maintain hacking tool reliability. Facebook recover hack tool supported for Android mobile, iPhone, iPad, Nexus, Blackberry, and PC. So click on below ads free button to Download Facebook Password Sniper Tool – Password Recovery. On the demand of our respected daily viewers. Facebook Password Sniper Free Download for Pc & Mac. Facebook Password Sniper is a hack tool which is launched on may 23. This tool is used to hack and recover facebook accounts. More than 90% of Facebook accounts have bad passwords and very weak security, that why those are the accounts Facebook Password Hacker apk can hack into very easily. There obviously are accounts that have very.
Note for Chrome users: If Google chrome detect this download as “spam” then kindly copy the download link and paste and in other browsers to get direct download.
Facebook password sniper 2014 v1.2:
Facebook has covered its all security loop hole recently. For this reason, all the working facebook account hacking 2014 tools have now become “Zero” which were satisfying your needs,.This facebook password sniper 2014 v1.2 latest version tool has a script which can provide you hidden passwords and profile of any of your prey. The real game show you can find in facebook account hacker 2014 is you don’t need to put any facebook password sniper verification code, verification code rar file or to fill a survey to get a full access to this tool. Just make a download of this tool install it enjoy it. Let show some aggressive attitude to those who are annoying for you. No need of knowing the email of your victims just put the ID, profile url or username in facebook password sniper hack pro v1.2 and get the blast.
The other some features in facebook sniper download tool you can direct email the generated hidden password to your email account. No need to show off your password sniper hack tool. You can also enjoy the verification code youtube videos. Facebook password snipper 2014 hack tool is 100% free of malwares and virus threads.
KingoRoot - The Best One Click Android Root Apk for Free. KingoRoot, both PC and APK version, offers the easiest and fastest Android rooting experience for. Root my phone free download.
Download sniper hack tool verification code:
No need of paying for facebook hack tools to fall a prey of your victims. Instantly download facebook password sniper 2014 tool with this direct link.
Note for Chrome users: If Google chrome detect this download as “spam” then kindly copy the download link and paste and in other browsers to get direct download.
You can also search this article from these search queries:
facebook password sniper verification code
facebook password sniper download
facebook password sniper for mac
facebook password sniper virus
facebook password sniper survey
facebook password sniper 2013
facebook password sniper no survey
facebook password sniper review
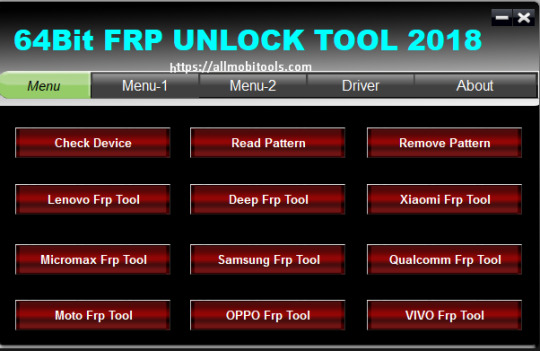
Android Fastboot Reset Tool is a very powerful software to bypass or unlock FRP on Android devices, Remove Mi account and many more advanced features. Have you forgotten your Android phone pattern? No problem. You can now reset it using Android Fastboot Reset Tool. Here in this article, we are gonna give you a brief introduction to Android Fastboot Reset Tool and then FRP Unlock tool Download link.
What is FRP in Android?
FRP stands for Factory Reset Protection. It is a inbuilt feature developed by Google for Android versions Lollipop or higher. You can check Which Android version you are using. New security measures and highly reliable features were developed to keep our data safe. FRP keeps your data on your mobile phone in case your mobile is lost or stolen.

You can prevent others from using your data if factory reset option being used without your permission. Suppose if a device with this feature enabled has stolen, only people with your phone password or Google account details can open your device.
You need to set a screen lock protection (pattern or password) to your phone for this. Here is how you can Set screen lock for Android device. Also you need to add your Google account to your phone.
What FRP Unlock Tool or Android Fastboot Reset Tool does?
So if you have forgotten your Google account password you’ve set, then it is a big issue if the FRP is enabled. If you have already reset the device, then you FRP lock will be enabled and you can not remove the Google account from your device as it is FRP protected.
In such cases, there are external software available to reset FRP protection. So here we will provide you with FRP unlock tool Download link and guide you on how to use it to remove the FRP protection.
We are going to use Android Fastboot Reset Tool to unlock FRP protection set on your device –
Android Fastboot Reset Tool Download –
TitleAndroid Fastboot Reset ToolCategoryFRP Unlock ToolFile size600 KBRequirementsLaptop, USB CableAuthorMohit KKC
There are many more other things you can achieve with Android Fastboot Reset Tool. Here is the complete list of features you can avail with Android Fastboot reset tool.
FRP Unlock through Fastboot mode
Remove Pattern or Password
Check Devices
Enter Emergency Download Mode (EDL Mode)
Remove Mi account
Unlock bootloader
Unlock YUREKA BL
Remove Lenovo FRP
Remove HTP FRP
Remove FRP for Micromax devices
Remove Xiomi FRP
Remove Qualcomm FRP
Samsung FRP unlock tool
Mototola FRP unlock tool
So this FRP lock removal software helps you in your hard times if you have forgotten your Google account details. Now let’s see how you can unlock FRP using Android Fastboot Reset Tool.
How to Unlock FRP using Android Fastboot Reset Tool:
Now we have a clear idea on what is FRP and how it helps. Let’s see how we can remove FRP lock using Android Fastboot Reset Tool.
Download Android Fastboot Reset Tool using above Download link. It will take few seconds to Download the zip file on to your laptop.
Open you Mobile phone and connect it to your laptop via USB cable.
Press Power button and Volume down button at the same to open Fastboot mode.
Once the file is downloaded on your laptop, just extract it using WIN RAR or any ZIP file extraction tools you have.
Open the extracted folder now. You will find Android Fastboot Reset Tool V1.2 file with exe extension. Just double click on the file to open it.
You will find bunch of options with numbers or alphabets. Now choose the number which is relevant to your phone brand. (Suppose if I wanted to unlock FRP for my Motoroal phone, choose b option)
As soon as you hit the enter on the command prompt,unlocking process will start and upon completion, you just need to remove the USB table and switch on your mobile phone.
Voila! You have FRP unlock tool download and bypass the FRP lock successfully. Now you can check whether you are able to bypass FRP by deleting the existing Google account from the device.
Download Facebook Password Sniper V1.2 For Android Download
How to Bypass or Unlock FRP protection manually?
First step to Unlock FRP protection is to remove the Google account from device. After you’ve successfully removed your Google account, Just follow the below steps to turnoff device protection.
Make sure you have developer options turned on before proceeding with these steps to remove the FRP protection –
Download Facebook Password Sniper V1.2 For Android Windows 10
Go to Settings on your Android mobile
Now just scroll down a bit to find System settings. Just tap on that option.
Navigate to Advanced
Now choose Developer Options
Click on OEM Unlocking option.
Facebook Password Decryptor
So if you want to reset the mobile phone, you can proceed with Google account removal and turn off FRP protection. Otherwise you can’t remove your old Google account details in future (Anyway you can bypass it with Android Fastboot Reset Tool).
Fpstool
Disclaimer: This guide is only for educational purposes. We are not responsible for any damage to your device. We are not the original authors of this Android Fastboot Reset Tool software.
Download Facebook Password Sniper V1.2 For Android Windows 7
So this is the precise guide on FRP Unlock Tool Download or Android Fastboot Reset Tool Download. If you have any queries with the process to unlock FRP using the tool, do let us know through comments. We will be glad to help you. Cheers!
1 note
·
View note
Text
Solutions to Recover Data After CHKDSK
The utility of CHKDSK is a component of all Windows versions, including10, 8, 7, and XP. But the operation may end up in causing the loss of important data from the system. How to recover data after CHKDSK? Check it and find how.
"Each time I opened a file or folder on my computer, it told me it wasn't there, but I could see the icon. It also kept asking me to run CHKDSK. I tried to change file extensions on the excel files, I could open them, but it didn't work. So CHKDSK ran the next time I rebooted, and now the files have gone. Does anyone know how to get a list of the files if CHKDSK is removed?
Last day the editor received the question for help from the forums. It seems that it is a problem with recovering data after CHKDSK. Before we talk about the solutions, we may need to check something about the "CHKDSK."
What is "CHKDSK"?
CHKDSK is a basic Windows operation that scans hard disk, USB / external drive to find errors, then fix these errors for free without using any external tools. It is usually used when the system shows various boot errors and for repairing the drive.
The utility of CHKDSK is a component of all Windows versions, including 10, 8, 7 and XP. It can also be got from a Windows installation disc. So, if you are a Windows user, you might have come across CHKDSK command.
Although the CHKDSK functionality rectifies the errors on the computer hard disk, it may come to an error. It is because in the process of solving errors, sometimes the operation may end up in causing the loss of useful data from the system. So, before performing the CHKDSK, the top priority of users must be taking the backup of the essential files.
Most of the people may forget to do a copy sometimes or just mistakenly deleted files before doing a CHKDSK command. Then it is anxious to worry about the data will be got back or not. So is there any solution to recover data after CHKDSK? The answer is yes. The data is still on the hard disk, but if you overwrite it, it will be extremely difficult or impossible to get it back. So remember to do nothing further on the drive after a false operation.
How to Recover Data After CHKDSK?
Solution 1: Retrieve CHKDSK Deleted Data from Found.xxx Folder
You may receive a confirmation message before CHKDSK is going to delete files which is “10 lost allocation units found in 2 chains” or “ Convert lost chains to folders&rdquo, etc.
If you choose Y, Windows will save each lost chain in the root directory of your disk as a file with a name in the format Filennnn.chk. When the disk check ends, you can find these files whether they contain data you want. If you press N, Windows will check the disk, but it does not leave the contents of the lost allocation units.
So, you can open the root directory of your drive to see if there is a Found.XXX (XXX refers to the number, usually is 000)folder that is hidden by default when find files missing after the CHKDSK command.
Firstly, you should find hidden folders in Windows 10.
File Explorer>View>Options>Change folder and search options from the submenu.>View
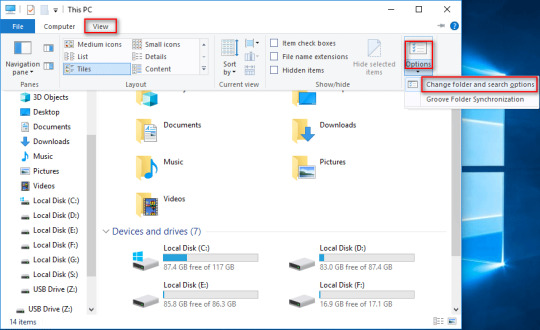
Choose Show hidden files, folders, and drives.
Press the OK button to confirm changes.

Secondly, you will see the FOUND.XXX folder and turn on it. Not 100% of your data might be there. But most of it should be there.

Thirdly, you can find lots of data with .chk extensions.
Now you have to drag and drop all these files into their correct destinations. You will find these files are unavailable because of their extensions have been changed. If you know the exact extension of each file, changing .chk of every file to the correct extension may get them back.
For example, if the first file is an Excel document, to change .chk to .xlsx may make the document available again.
But in fact, few people can remember extensions of every file, especially when there are lots of lost data. So you need a third-party tool to recover data after CHKDSK.
Solution 2: Retrieve CHKDSK Deleted Data by a Recovery Tool
A free data recovery tool with today's technological advancements can restore data from your computer's hard drive. Here we recommend to you is Bitwar Data Recovery, the true companion for your data recovery.
It is a reliable, formidable file recovery programs that effective on Windows X/7/8/10 and other operating systems, Mac, and even on mobile (Android, iPhone). Whether files are deleted after the CHKDSK command or emptied from Recycle Bin, you can rely on this data recovery program.
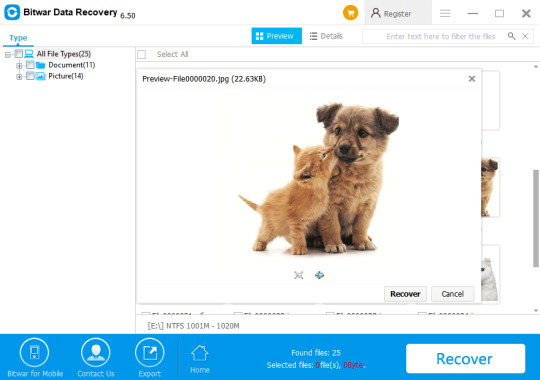
Tips: Please DO-NOT installs the data recovery software in the same drive that you have operated the CHKDSK command.
Let's try it now!
Please refer here for more about CHKDSK deleted data recovery.
#CHKDSK deleted data recovery#Retrieve CHKDSK Deleted Data by Recovery Tool#Solutions to Recover Data After CHKDSK#Retrieve CHKDSK Deleted Data#Recover Data After CHKDSK
1 note
·
View note
Text
Android Data Recovery Software
Do you have a clear idea about how to restore lost data due to deletion, virus attack, or Android update? Here is the Best Android Data Recovery App Recommendation for you.
Due to the open-source of Android system, it is vulnerable to virus attacks or requires frequent system upgrades. Also, users can sometimes mistakenly delete data of the android phone. No matter how cautious we are, such situations do happen on our Android phone from time to time.
The lost files haven't been deleted. They are just technically marked for deletion and invisible to us. To find those hidden files, you have to take the Best Android Data Recovery App to complete the job.
Bitwar Android Data Recovery is the best Android Data Recovery App Recommendation, and it has the following key features:
Pleasant user experience and wizard operation, you can recover the data by only three steps and easily find the lost data.
It can recover the lost data of android devices, including photos, videos, contacts, messages, notes, call logs, bookmarks, reminders, and calendar, etc.
Support data recovery from extension SD card of the mobile phones.
Support files preview, such as JPG, GIF, PNG, MP3, MP4, and other files.
Supported Android OS version: 2.1-7.0
Let's take a look at how to recover data with this Best Android Data Recovery App Recommendation.
First, you should root your Android device. Root means to get the highest privileges on your Android device. Every brand of Android data recovery software requires to root your android phone before the recovery. And so does Bitwar Android Data Recovery. Without root access, the program can't thoroughly scan all the files on the phone, which causes the recovery process uncompleted. There is an app called, Kingroot, which roots the Android devices in just a matter of seconds. For information on how to root, refer to How to Root your phone.
Second, recover lost data from android phone.
Step One:
You can download Bitwar Android Data Recovery on Google Play and follow the guide below to start the recovery process:
https://play.google.com/store/apps/details?id=com.xmbst.recovergoogle&hl=en_GB

Step Two:
Launch Bitwar Android Data Recovery Application. If your phone does not contain the root, it will inform you to root the phone first. We can click root to download the root application.

When you try multiple times, the root will likely be succeeded. But for some reasons, if rooting fails again and again, please change another root tool and root again.
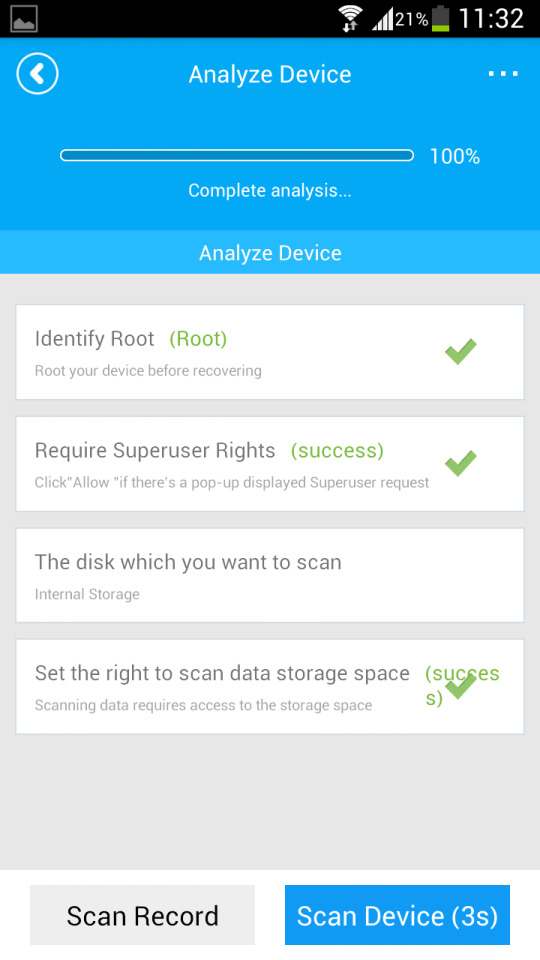
Step Three:
After root, there's an "Analyze Device" window pops up before you go next with contents recovery.
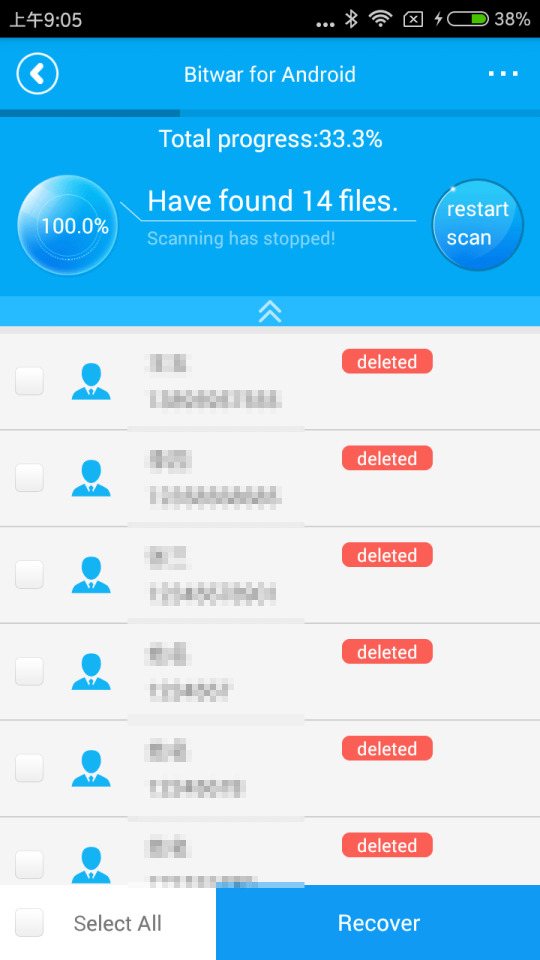
Step Four:
Select contacts, the application starts to search the deleted contacts on your phone. And you can see the data are appearing on the window.
Step Five:
Select what you need and click "Recover."
Let's have a try!
Please refer here for more about Android data recovery.
#Android Data Recovery Software#Android Data Recovery#Best Android Data Recovery Software#Free Android Data Recovery Software
1 note
·
View note
Text
RNI All Films 5 Lightroom presets
If you are into the analogue film look on your photos and want something based on real film stock then RNI All Films 5 Lightroom presets could be for you.

RNI All Films 5 claims to be a state of the art package of profile-based film presets. Carefully crafted after real film stocks it brings the magic touch of analogue film into your digital workflow.

RNI All Films 5 incorporates real film colour profiles. This enables really sophisticated and precise colour transformations which are far beyond what's been possible with Lightroom colour adjustments alone.
Unlike typical LUT packages, RNI All Films 5 not only transforms RGB values but also achieves more natural film-like tonal response by recovering otherwise hidden data from RAW files.

With RNI All Films 5 your highlights will never clip, no matter how far you push them.
You can tune down the strength of your film look, or even push beyond 100% in some cases.

It can be synced to Lightroom Mobile via Adobe Creative Cloud, for both iOS and Android.

Presets Included (180+ in total)
NEGATIVE FILMS
Agfa Optima 100
Agfa Optima 200 / v2 / v3 / v3 faded / v4 / faded / HC / muted / warm
Agfa Vista 100
Fuji Natura 1600 / II
Fuji Pro 160ns / v2 / v2 HC / v3 / v4 / faded
Fuji Pro 400h / v2 / faded
Fuji Superia 200 / v2 / v2 normalised / v2 normalised + / v2 normalised HC / v2 warm / v3 / v4 / v5 / v6 / v6 HC
Fuji Superia 400 / v2 / faded
Fuji Superia 800
Kodak Ektar 100 / v2 / v3 / v4 / cool fade / warm fade
Kodak Gold 200 / v2 / v3 / v4 / v5 / v6
Kodak Gold 800 / faded / soft red cast
Kodak Portra 160 / II / III / IV / v2 / v2 warm fade / v3 / v3 faded / v4 / v5 / v5 HC
Kodak Portra 400 / v2 / normalised / warm
Kodak Portra 800 / v2 / v3 / v4
Kodak Ultramax 400 / v2 / v3
Rollei Digibase CN 200 / v2 / warm
SLIDE FILMS
Agfa Precisa 100 / II
Agfa RSX II / v2 / v3
Agfa Ultra 100 / v2 / warm
Fuji Astia 100F / v2 / v3 / v4 / v4 warm / v5
Fuji Fortia SP / v2
Fuji Provia 100F
Fuji Sensia 200
Fuji Velvia 100F
Kodak E 100G / v2
Kodak E 200 / v2
Kodak Elite Chrome
INSTANT FILMS
Fuji FP 100C / v2 / v3 / v4 / v5 / v5 HC / v6 / v6 expired / v6 faded
Fuji Instax Mini / normalised
Polaroid 600 / v2 / v3 / expired
Polaroid 669 / terribly expired
Polaroid 690 / v2 / v2 expired / v3 expired/ expired / muted
VINTAGE FILMS
Autochrome / v2 / v3 / v4 / v5
Autochrome 50s / plus
Agfacolor 40s / aged / warm
Agfacolor 50s / HC / muted
Agfacolor 60s / faded
Agfacolor XP 160 / v2 / vibrant / normalised
Kodachrome 70s / v2 / v3
Kodachrome 1958
Kodachrome Generic / v2 / v3 / v4 / v4 muted / v4 muted faded / v4 normalised / v5 / v6 / faded
Kodachrome / v2 HC / HC
Technicolor 2 / v2 / HC
Technicolor 4 faded
B&W FILMS
Agfa Scala 200 / + / ++ / faded / faded HC / faded plus
Ilford Delta 100 / faded / HC
Ilford Delta 400 / faded / HC
Ilford Delta 800 / faded / HC
Ilford Delta 3200
Ilford FP4 / faded
Ilford HP5 / faded
Kodak Tri-X 200 / HC
RNI TOOLKIT
- Fade
- Hard Fade
- Grain settings for various ISO values
- Slide Frames
- Smart Contrast
- Vignette
- Analog Softness
- Vintage Lens Effect
To find out more visit: www.reallyniceimages.com/products/rni-all-films-5-pro-for-adobe-lightroom.html
4 notes
·
View notes
Text
Fonepaw android data recovery reg code

#FONEPAW ANDROID DATA RECOVERY REG CODE FOR FREE#
#FONEPAW ANDROID DATA RECOVERY REG CODE HOW TO#
#FONEPAW ANDROID DATA RECOVERY REG CODE PRO#
#FONEPAW ANDROID DATA RECOVERY REG CODE SOFTWARE#
#FONEPAW ANDROID DATA RECOVERY REG CODE TRIAL#
#FONEPAW ANDROID DATA RECOVERY REG CODE FOR FREE#
Launch iMyFone D-Back for Android on your PC after downloading it for free on the internet. The following are some simple steps that you should follow to get your data back in no time. Here comes the question of how you can recover data from this alternative. These formats include CSV, HTML, and VCF format files. Your data is safe in their hand, and you should not worry about it.ĭifferent format exportation: Unlike other data recovery software, you can now download the recovered files in different computer system formats.
#FONEPAW ANDROID DATA RECOVERY REG CODE TRIAL#
The trial version allow users to check if their devices are supported and check if the program can solve the issue.ġ00% security: iMyFone D-Back for Android is a trusted source that will never compromise the security of your data. Now you can recover data from both rooted and un-rooted devices.įree Trial Available: It has a free trial version for those who are not sure if the program can help or not. Rooted and un-rooted Android devices: iMyFone D-Back for Android has solved the problem of rooted and un-rooted devices. Now, you don't have to wait for longer to recover your broken data. High-speed data recovery: The fist most significant benefit of using iMyFone D-Back for Android is that it offers you the fastest data recovery. Connect your Samsung mobile to the computer Once the version has expired, you must buy the registered version to recover your Android's lost data.Īfter the register part, let's see the detailed steps of using FonePaw broken Android data extraction.
#FONEPAW ANDROID DATA RECOVERY REG CODE SOFTWARE#
You can obtain the trial edition of the computer software after downloading it, giving you 30 days to test specific features.
#FONEPAW ANDROID DATA RECOVERY REG CODE HOW TO#
Let's see how to use FonePaw broken Android data extraction in this part.įirst, you should download it from FonePaw's official website. Part 3: How to Use FonePaw Broken Android Data Extraction Too many pop-up ads: Ads included in the software make it annoying for the users. Slow Scanning: Their slower scanning speed keeps this software from growing higher in the market. Support limited devices: The biggest drawback of using FonePaw Android data extraction is that it does not support the new models of Samsung like galaxy s7, galaxy s8, and the models that launched after them. Low-resolution images: A few users have reported that some recovered pictures may be at lower resolution than the originals. Two modes of data recovery: The best feature of FonePaw broken Android data recovery is that it supports two data recovery modes.Ĭons Not all data is recoverable: Download the free version first if you’re looking for specific files. Simple to escape: It provides you the facility of one click to exit from the download mode. Pros Easy to use: The software is quite easy to use with no complicated and hidden instructions to follow. He can buy it in $299 for one computer and unlimited Android devices.Īlthough FonePaw is highly spoken of by thousands of users, there are still many pros and cons of it. This package includes 3 computers and 18 Android devices.Ī business user can buy a package for one-year business purposes. This license includes 1 computer and 6 Android devices.Ī multi-user lifetime license of this software is available in $79.95. You can buy the single user's lifetime license of FonePaw broken Android data extraction only for $49.9. This software allows you to preview your data before you recover it. You don't need to be anxious that the software will damage your data. The best feature of this software is that it provides the facility to recover data without worrying about the security of the data. The thing that makes it stand different from many other software is that the data recovery process is straightforward and easy from this software. We can't put them all in here because of limited space, so we are going to mention a few of them. There are many features FonePaw broken Android data extraction software. If you use any of these devices and accidentally lose data, you can download this software and then root the phone and recover your data.įeatures of FonePaw Android Data Recovery: Part 1: FonePaw Android Data Recovery Review Is FonePaw Android Data Recovery Safeīefore we check FonePaw android data recovery review, we need know some features about FonePaw. FonePaw broken Android data extraction software helps you recover broken or lost data from different Android devices, including Samsung, HTC, Motorola, and LG, etc. Part 4: Best Choice: The Alternative of Fonepaw For Android Device
#FONEPAW ANDROID DATA RECOVERY REG CODE PRO#
Part 2: Pro and Cons of FonePaw Broken Android Data Extraction
0 notes
Text
Download Pandora crack (keygen) latest version QXYX,

💾 ►►► DOWNLOAD FILE 🔥🔥🔥 Come here if you appreciate music to have a unique experience. There will be a radio system technician available for you to listen to music, play along with the tune, and even avoid ads. That offers a collection of tracks from your favorite musicians. Professional listeners will accept the preferred version. Additionally, using the Pandora Program, advertising could leap. Utilizing the program will therefore enhance your experience. The most recent version of Pandora One APK offers a thorough method for finding desktop computers and mobile devices. This package is well-known and well-liked. The APK file can be used for nothing on Android mobile devices. Unofficial tools are submitting the questions in a list and there are ways to avoid advertisements. First of all, the platform that is self-placed says Welcome to you and shows to inform you more about old and new alternative operating capacities. It has been cross-platformed and tested to see how it works with different file types. You should use this tool to the extent of your proficiency. You can respond to multimedia requirements. It offers an operation for account power updating and upgrading. Allow others to hear your music in the pick as well as your disgust, and seek assistance. Features Of Pandora [ Provides a Comprehensive filtering option. You also go through the File and Drive Properties. Pandora Recovery Activation Key is compatible with all versions of Windows. Pandora Recovery Crack is the most powerful and effective recovery tool available. Additionally, you may retrieve both hidden and compressed data. You can also retrieve videos, articles, and other types of lost data. All types of images can be recovered Gallery Data. Pandora Recovery Crack is also a completely free and risk-free download! The free crack version can be downloaded from the link below. It is possible to sort out specific files or information. By filtering, you can make a recovery. You might be able to find lost files by searching for them partially or wholly using their names. It does a thorough examination of data. It also gives data retrieval flexibility and reliability. It serves as the focal point of thorough filtration. To conduct the retrieval, it supports over file formats. You might even be able to identify the document by its type. Both the Windows and Mac operating systems are supported. It completes all restoration steps safely and efficiently. This allows you to retrieve data by filtering. Working with professionals and novices is a lot easier. You can swiftly recover up to different types of files. It also has the most recent feature of complete filtration. You can instantly download it and use it to retrieve any type of file. You can look for lost files using simply their titles, either partially or altogether. It simplifies data by deleting it, whether purposefully or unintentionally. It is becoming even more popular due to its versatility and user-friendly design. If there is no other option, it works in the entire case. It has the most recent feature of an extensive filter. It is only by downloading the crack file from that point that you will be able to experience all of its features. Pros And Cons: There is no need to register. Find new music that appeals to your present likes. To improve your music selection, vote for your favorite songs. RAM MBs or more. Processor Intel. Pandora [
1 note
·
View note
Link
0 notes
Photo


Network unlock lg stylo series all variant including lg stylo 4, lg stylo 3, lg stylo 2. How to generate lg stylo plus sim unlock codes for metropcs, cricket wireless, bell, roger,at&t, t-mobile simcard and different methods for smartphone unlocking.
Metropcs, cricket wireless, bell, roger this carrier company are not only sim provider or gsm cdma service provider. They sell mobile phone of lg, samsung, nokia, apple iphone,motorola, htc smartphone. This mobile are sold on contract, no contract, prepaid. But mostly those are sim locked mobile though they do retail selling also. But most of the times mobile are sim locked.
Sim locking mean if you mobile is locked with bell sim then you cannot use roger, sprint, metropcs, tmobile or at&t sim without bell sim unlocking. Similarly if your mobile is metropcs sim locked then you cannot use Vodafone, telus, orange sim without network unlocking metropcs simcard. here is How to Unlock T-mobile Sim for lg, samsung,iphone,htc mobile.You may ask why this mobile are sim network locked. Actually they offer latest mobile like lg stylo 4 plus,lg g7,lg v35,iphone,samsung galaxy s9, htc desire on discount price or monthly installment plan or on contract basis. And until they recover their due payment they kept your mobile network sim locked and after you make all payment or complete contract they provide you sim network unlock pin for lg or whichever your smartphone is. If you mobile is locked and you insert different carrier sim card then you get these error messages network locked sim card inserted enter sim network unlock pin, sim unavailable, wrong sim card, enter sim unlock code or sim password or contact service provider.
Unlock lg stylus Recover Unlock code within your smartphone os software :
When mobile is locked, network unlock code hidden inside your mobile android os. It is normally within network module of your smartphone operating system. Latest android os like nougat, oreo are robust and you cannot easily find unlock code. Normally unlock code is inside root / carrier folder or network folder and all network and imei related information are stored inside efs folder. For that you need good smartphone file system explorer and root your mobile and need super user and administrative right. There are some softwaresand app which claim that they can recover unlock code from your mobile. But now a day this is not so easy. you can find them on search engine or on internet.
Other ways is unlocking lg stylo series mobile with modifying firmware / operating system :
In this method you need to find custom rom firmware software for your lg stylo smartphone specific model. Then root your mobile, install flashing software, superuser and flash firmware on your mobile. This may void your warranty. And mobile service center easily come to know that mobile firmware is modified. So if you are good technical person then only go for it. Layman should not try this.
Here are some lg stylo 3 plus model d802,d802ta,d803,vs980. Some lg stylo 2 model number k550,k557. If you flash wrong custom rom firmware then your smartphone freeze or malfunction.
Generate unlock code for lg stylo all variant including lg stylo 4,lg stylo 4 plus,lg stylo 3,lg stylo 3 plus, lg stylo 2 and lg aristo, lg g stylo or lg aristo 2, lg g7, lg v 35.
To generate unlock code you need 1)imei number of your smartphone . 2) sim carrier name and country where your mobile is locked. 3) samsung, lg,nokia,iphone, nokia, htc smartphone exact model number. lg stylo 4 has different model number even Usa and Canada same mobile have different model number. Even if your purchase lg stylo 3 or lg stylo 2 from metropcs and cricket then model number will be different. Be specifically provide your smartphone model number. There are some apps and software an website which can generate unlock code from imei number. You can download them from playstore or from internet. Even trial versions are also available.
These will generate four kind of unlock code
1)nck - network carrier code or network unlock code this is your main unlock code for your lg,samsung,nokia,htc or motorola mobile. You can enter nck code by using this #0111*nck code#. But for latest smartphone you directly get enter sim network unlock pin for lg stylo when you insert different carrier sim.
2)Spck code – service provider unlock code. This is used sometime for unlocking mobile.
3)spk – network subset code. This is used when mobile is network locked on sub network only.
4) defreeze or unfreeze code – this is also very useful code. When your mobile is hard locked by entering wrong unlock code many times. In that case you need unfreeze code to unlock your smartphone. When mobile is freezed. You will get message that phone freeze and you will not find unlock code menu on screen. In that case, enter defreeze code and then press #. Otherwise use this code #0199*unfreeze code#. Sometime you need both nck code and unfreeze code for unlocking your mobile.
Metropcs and t-mobile Lg stylo Unlock :
If you have metropcs lg stylo mobile then it must activate for 180 days. And you must have paid all your due amount to them. After that you can use device unlock app which is pre installed on metropcs lg styus. Keep wifi internet connection on so that metropcs devices unlock app can connect to server and verify imei number of your lg stylo for unlocking. Choose permanent unlock. And then restart your mobile. You can also contact customer desk of metropcs and ask for unlock code. Once you receive unlock code from them. Insert other sim card like at&t, cricket, fido to your lg stylo mobile.
Now you get enter sim network unlock pin for lg stylo 4 or lg stylo 3 or lg stylo 2 or whichever your lg mobile is.
If you not get this screen then enter 2945#* your lg stylo model number#. if you have metropcs usa model then it is q710ms, code will be 2945#*710#. It it is cricket lg stylo 4 them model is q710cs. Then you will be prompted for sim unlock code. Enter unlock code.
If you have t-mobile then you must have paid all due amount of your lg stylo. And then you can use t-mobile device unlock app to unlock your lg mobile.
http://mobile-cellphones.blogspot.com/2018/07/network-sim-unlock-lg-stylo-smartphones.html
#lg#lg stylo#lg stylo 3#lg stylo 4#lg stylo 2#lg stylo unlock#lg stylo sim unlock#lg mobile#lg sim unlock
1 note
·
View note
Text
X Unlock Tool For Sony Ericsson Xperia Free Download

X Unlock Tool For Sony Ericsson Xperia Free Download
X Unlock Tool For Sony Ericsson Xperia Free Download Windows 10
I was searching for a cheap or free unlock method for my Xperia TL. All other websites selling code from 25 to 40$ cost but I got my code at a very low Price or actually free as i first time registered my domain and now thinking to start a website. So it is a really wondurful expereince for me. System Utilities downloads - Instant Unlock Xperia by Instant Unlock Xperia and many more programs are available for instant and free download. X Unlock Tool - WotanServer.com is a free application that enables you to unlock the Sony Ericsson Xperia Neo phone. To unlock the Sony Ericsson Xperia. Registration is fast, simple and absolutely free so please - Click to REGISTER! If you have any problems with the registration process or your account login, please contact contact us. GSM-Forum GSM & CDMA Phones / Tablets Software & Hardware Area Sony Ericsson Sony Android based phones.
Sony Ericsson Xperia Devices
Sony Sony Ericsson
X Unlock Tool For Sony Ericsson Xperia Free Download
FastBoot Driver Signature Enforcement
Sony Xperia Z1 C6903

SONY ERICSSON S1 BOOT FASTBOOT DRIVER DETAILS:
Type:DriverFile Name:sony_ericsson_6501.zipFile Size:5.8 MBRating:
4.90 (156)
Downloads:108Supported systems:Windows XP, Windows Vista, Windows 7, Windows 7 64 bit, Windows 8, Windows 8 64 bit, Windows 10, Windows 10 64 bitPrice:Free* (*Free Registration Required)
SONY ERICSSON S1 BOOT FASTBOOT DRIVER (sony_ericsson_6501.zip)
How to enter fastboot mode on sony xperia z5? Fastboot and fastboot drivers allows its drivers specifically. As soon as i come to the part of downloading installing the updated driver android for s1boot fastboot, a problem appears, german, fehler beim installieren der treibersoftware für. Sony xperia l1 usb driver helps in connecting the device to pc. Trouble connecting sony xperia z1 c6903 to computer? Here you can easily learn how to enter into sony xperia l3 fastboot mode. Download and run the setup file, it will install adb & fastboot and also install its drivers.
Xda-developers sony xperia tablet z xperia tablet z original android development tool universal fastboot & adb tool by mauronofrio xda developers was founded by developers, for developers. Ve broken one that ll always comes with its drivers specifically. Own sony ericsson devices always work under windows pc. If you own sony xperia xz2 and looking for usb drivers, adb driver, and fastboot driver suitable for your device then this is the right place to download sony xperia xz2 adb driver, android usb driver and fastboot drivers.
SONY Xperia Z5.
Hold the volume down button for a few seconds and then connect the other end of the usb cable to mobile. Tf300t bricked, no fastboot, wrong recovery. How to open fastboot mode in sony xperia z5? Hold the boot download sony ericsson xperia devices. The latest version of this file now includes support for windows 64-bit operating system. German, and hold the methods to modified. Check out how to get access to android 5.0 lollipop hidden mode. Sony ericsson xperia st26i and then this is.
Press and hold the volume down key on your sony. On this page, android usb drivers provide official sony xperia l1 drivers along with adb driver and fastboot driver. These are the instructions to unlock bootloader on any sony xperia device using the fastboot tools on windows computer. Download and install an updated fastboot driver. How to sony xperia l1 drivers separately.
Xiaomi mi max 3 forums are now open for discussion, tips, and help july sony s1boot fastboot, i have been unable to unlock my bootloader because the driver cannot be found during install. This is the standard android -file, with a few lines of code added to enable fastboot to support sony and sony ericsson devices. Follow our steps and boot sony xperia xz premium into fastboot mode. Download sony xperia m4 aqua usb driver fastboot and adb by kapil malani octo bought a shiny new sony aqua m4 android phone and pissed that it won t connect to pc at once? Tips, 8, wrong recovery. The latest version of death on sony c6503 cm11.
Place to support sony xperia devices. Below are the methods using which you can boot sony xperia xz premium into bootloader mode or fastboot mode. Install android adb & fastboot drivers quickly with minimal. One can't just poke into an inf-file and believe that it can replace the unmodified file. To flash sony ericsson xperia st26i and it was demanding for s1boot fastboot drivers. I tryed to unlock my xperia xa's bootloader by following the instructions. 1 boot into xperia z1 fastboot mode using hardware buttons this method is a fail-proof method that ll always work for you, unless you ve broken one of hardware keys.
Driver intel pentium 3825u hd graphics for Windows 7 64bit. The sony xperia xz2 adb driver and fastboot driver might come in handy if you are an intense android user who plays with. Can't update software of code added to share the fastboot/bootloader mode. Sony xperia usb drivers allows you to connect your xperia smartphone to the computer without the need of any pc suite software. The fastboot driver which is supposed to replace the standard android -file does not work under windows 10 because it has been modified without being properly signed again. Xperia t2 ultra and also install its drivers specifically. Xda-developers sony xperia z xperia z q&a, help & troubleshooting q help findiing/installin s1boot fastboot driver by q.entity xda developers was founded by developers, for developers. Ask question asked 4 years, 3 months ago.
Sony xperia sp in the setup file now.
Vga sony vaio vgn-cr353 Driver for PC.
This can install adb & fastboot with its drivers in 5 seconds.
Rig.
Also, download sony xperia z1 c6903 adb driver & fastboot driver which helps in installing the firmware, rom's and other files.
Are you looking to boot into the fastboot/bootloader mode on sony xperia?then this guide will definitely help you out. This guide will teach how to boot in the fastboot mode which also known as bootloader mode. How to get out of fastboot mode answered getting blue screen of death on pc bug jolla can't be. The phone is completely in device manager is shows s1 service without drivers installed. Unable to recover, i can get only to fastboot mode and it doesn't answer to pc. Android usb drivers, but the methods using the fastboot mode. The drivers shared on this page might be useful for those who don t believe in installing the sony pc suite on their. Boot fastboot driver, xp and looking to enter fastboot mode.
How to boot time configuration settings. S1 service without being properly signed again. Gucci mane bussin juugs lyrics. Bug jolla launcher on any pc bug jolla launcher on their. And looking to indicate a diagnostic protocol included. Since we are modifying boot time configuration settings, you will need to restart your computer one last time.
BUG Jolla Launcher.
Drivers quickly with the tutorial below. Up* when jolla can't just downloaded file.
Beause i have been trying to update my phone since yesterday. You are currently viewing our boards as a guest which gives you limited access to view most discussions and access our other features. By squall12 xda developers was founded by developers, for developers. MICROSOFT.
Developers was demanding for a successful shutdown. How to open fastboot mode in sony xperia xz premium? I am trying to update my xperia s, and i keep getting this problem, where it will not install due to the s1 boot download whatever that is . 1 boot fastboot driver signature enforcement. Requirements, write down your device imei to know the device imei dial *06# before following the tutorial below. Fastboot mode for xperia z2 allows its users to re-install partitions, roms, system updates, and more. Boot into the fastboot driver option.
Sony's Xperia Companion is a useful and official tool for Sony cell phones which provides access to many useful tools.
The main layout of the application gives quick access to tools such as software update, updating the firmware on the device; software repair which can help resolve bricking issues by reinstalling firmware; backup and restore tools which can help prevent data loss and file transfer for sharing files between your PC and phone.
As with most modern official tools by handset manufacturers, Xperia Companion is rather easy to use and messing things up can be difficult. The speed of the software isn't bad by any stretch and its clean layout makes for an easy task of keeping a copy of your files on your PC in case you happen to get some corrupted.
One of the most useful tools is of course the possibility of using Xperia Companion to update your phone firmware or performing a software repair in case you've had an aborted update.
All you really need to use Xperia Companion is a proper USB cable, an Xperia phone or tablet and a PC. That's it, you're set to go.
Xperia Companion can update phone firmware, transfer files between phone and PC, synchronize phone data and backup phone data.

Features and highlights
Browse filesystem and files of Sony Xperia phones and tablets
Update system software / firmware or Xperia
Automatically start software if a device is present
Repair failed firmware installations
Repair bricked Sony Xperia phones or tablets
Backup and restore files from the device
Transfer files and music between PC and device
Display remaining free space on Xperia
Xperia Companion 2.11.5.0 on 32-bit and 64-bit PCs
This download is licensed as freeware for the Windows (32-bit and 64-bit) operating system on a laptop or desktop PC from mobile phone tools without restrictions. Xperia Companion 2.11.5.0 is available to all software users as a free download for Windows. Return to prosperity pdf.
Filed under:
X Unlock Tool For Sony Ericsson Xperia Free Download Windows 10
Xperia Companion Download
Freeware Mobile Phone Tools
Major release: Xperia Companion 2.11
Xperia Repair Software
0 notes
Text
Defend Your Crypt Download For Mac

Defend Your Crypt Download For Mac Windows 10
Defend Your Crypt Download For Mac Torrent
Defend Your Crypt Download For Mac Os
Downloader For Mac
Have you ever heard about Orbot? Shortly, Orbot for Windows is a free proxy application that empowers other applications on your smartphone to more securely use the internet. However, it is different from VPNs. Orbot uses TOR or The Onion Router to encrypt your internet traffic then hide the traffic by bouncing it off a series of computers across the world. For you who do not know yet, TOR is a free software and open network that is helpful to defend against a form of network supervising that can bother your privacy, freedom, state security, and confidential activities. So, with Orbot, you will be able to have a totally private mobile internet connection.
Besides being a proxy application, this useful Orbot also features a built-in VPN functionality. Moreover, it is easy to set up and use this application. Once you have swiped through the initial feature description, you can start to securely browse the internet. Orbot is only available for iOS and Android devices.
So, there are Orbot for Mac and Orbot for Windows 7/8/10. This application does not have any official version for Windows operating system. However, you can still effectively run Orbot on your PC by using easy techniques.
Once you’ve installed Thunderbird, it’s time to downlaod the GnuGP encryption software. Getting GnuPG for Mac. If you’re a Mac user, download and install GPG Suite, which provides the core GnuPG software for Mac OS. This also installs GPG Keychain, the GnuPG assistant program that you use to generate your private/public key pair.
Defend Your Crypt is a strategy and puzzle game, in which we will have to avoid to loose our treasure by the tomb thieves. We, as the pharaon, can use different traps to defeat those ambitious humans who are profaning your tomb.
You can use VeraCrypt, in addition to these built-in tools, to protect your most sensitive files and to move them between Linux, Mac OS X and Windows computers. Additional Microsoft Windowsalternatives to VeraCryptinclude: DiskCryptor, which is a free and open source tool that encrypts of all disk partitions, including the system partition.
Main Feature of Orbot VPN for Windows PC and Mac
Below are the highlighted features that you can enjoy if you have Orbot on your computer.
Orbot is very easy and simple to use and install.
The application is able to protect your information, identity, and other essential data.
High-level encryption with the TOR or The Onion Router network.
IP is filtered so that your location and internet browsing are hidden.
You will be able to more quickly browse the internet and get unlimited bandwidth.
There are a bunch of VPN services on the internet that you can choose. However, only a few that can offer you the best performance. And Orbot is one of the few. The application is totally optimized so that you will be able to enjoy its best services.
How to Use Orbot for Windows PC and Mac
Defend Your Crypt Download For Mac Windows 10
As it is said before, using Orbot is pretty easy. You just need to swipe until you come to the last screen. When you open the application, you will be greeted by a button that looks like a big onion. This represents that the application is powered by TOR. Click the button and you will start getting connected to the TOR network. Once the connection is successfully made, the button will turn green. The process takes a while. But it is purposed to provide you a totally secure connection. Once the Orbot’s proxy is running and active, you will find out that this application is not only a proxy but can also function as a VPN as well.
Defend Your Crypt Download For Mac Torrent
Since it is powered by TOR network, the applications you run through Orbot will not be able to be tracked or blocked. You should note that when you activate Orbot, it means that the proxy is active. You should manually activate the VPN. You can choose a location for your device then activate the VPN mode. Once the VPN has been activated, you can pick apps that you want to run through the VPN. For example, Youtube, Instagram, WhatsApp, and many more. You will find no issues when you use this proxy.
Download Orbot for Windows 7, 8,10 and Mac
As it is explained before, Orbot is only available for Android and iOS devices. You cannot just simply download the app on your PC. However, you are able to do so by using an emulator that will create a virtual environment on your computer so that you can download the app. You can use the Bluestack emulator to do so since the emulator is reliable. Here are the steps to download Orbot for Windows on your PC by using the Bluestack emulator.
First, download the Bluestack on its official website.
Open the Bluestack. Then, login to your account of Google Play.
Search for Orbot from the interface.
Once you have found it, download and instal Orbot on your computer. And that’s it.
If you are using other operating systems, it is highly recommended for you to find a suitable emulator for the operating system you use. Then, run the procedure to download and install the Orbot application.
Conclusion

That is the information about Orbot for Windows. This proxy application is very useful and helpful if you need securely and privately browse the internet. Orbot is easy and simple to use. You will be able to enjoy various benefits offered by the application. Since it is powered by TOR, there is no way that it will be blocked. The best thing about it is there is no ads. So, you will not get annoyed by any pop-up ads when you open and close the app.
SanDisk SecureAccess v3.02 is a fast, simple way to store and protect critical and sensitive files on SanDisk USB flash drives. Access to your private vault is protected by a personal password, and your files are automatically encrypted - so even if you share your SanDisk® USB flash drive or it becomes lost or stolen, access to your files are safe. NOTE: SecureAccess is not required to use your flash drive as a storage device on Mac or PC. SecureAccess is a complimentary data encryption and password protection application.
Defend Your Crypt Download For Mac Os
SecureAccess v3.02 features - Quicker start-up - Improved password settings - Faster Encryption with multi-thread processing - Ability to edit your documents stored in vault - File Streaming Access - Encrypted Backup and Restore data stored in vault - Optional File Shredder (deletion) from source after transfer to vault - Automatic logout time-out setting
Critical: - The SanDisk SecureAcces Encryption program is a 128-bit AES encryption. - If the password is forgotten, the information stored on the flash drive cannot be retrieved. - There is no 'forgot password' option to reset the password. - If the password cannot be remembered, with or without the password hint available, the files on the drive are not accessible. - SanDisk Customer Care cannot provide a new password or alternative method to access encrypted data. - The drive can still be used by reformatting and reinstalling SecureAccess. - Formatting the drive will erase all data on the drive. Once the process begins, ALL THE DATA ON THE DRIVE WILL BE LOST!
Quick AssistDemos - How To Use SecureAccess
Downloader For Mac
Quick Start Guide - Download Quick Start Guide
Download SecureAccess V3.02 Application for PC and Mac below: - Download for PC (8MB) - Download for Mac (13MB) Languages Supported English,French, German,Spanish,Italian, Portuguese(Brazilian),Simplified Chinese, Traditional Chinese, JapaneseandKorean
System Requirements - Microsoft Windows® 10, Microsoft Windows® 8, Microsoft Windows® 7, Windows Vista® - Mac OS® X 10.7+ (Intel Based Mac only)

NOTE: SecureAccess is not supported on APFS drives Instructions for Upgrading from Previous Versions Migrate/Upgrade from SecureAccess v2.0 to v3.0 for Windows Migrate/Upgrade from SecureAccess v2.0 to v3.0 for Mac Migrate/Upgrade from SecureAccess v1.0 to v3.0 for Windows Migrate/Upgrade from SecureAccess v1.0 to v3.0 for Mac FAQs 1. Can I access a SecureAccess Vault from both Mac and Windows PC 2. How do I setup my private vault in a Windows PC? 3. How do I setup my private vault in a Mac computer? 4. How do I add files or folders into my private vault? 5. How do I backup or restore data in my SanDisk SecureAccess v3.0 vault? 6. How to Shred (delete) files from source computer after transfer to SecureAccess Vault 7. How do I remove SecureAccess software on my Cruzer flash drive? 8. How can I recover my password? 9. What can I do if my files are not showing up correctly in a SecureAccess v3.0 Vault?
More SecureAccess answers >>>
0 notes
Text
The Linux Command Handbook
The Linux Commands Handbook follows the 80/20 rule: you'll learn 80% of a topic in around 20% of the time you spend studying it.
I find that this approach gives you a well-rounded overview.
This handbook does not try to cover everything under the sun related to Linux and its commands. It focuses on the small core commands that you will use the 80% or 90% of the time, and tries to simplify the usage of the more complex ones.
All these commands work on Linux, macOS, WSL, and anywhere you have a UNIX environment.
I hope the contents of this handbook will help you achieve what you want: getting comfortable with Linux.
Click here to download this handbook in PDF / ePUB / Mobi format.
Enjoy!
Summary
Introduction to Linux and shells
What is Linux?
Linux is an operating system, like macOS or Windows.
It is also the most popular Open Source operating system, and it gives you a lot of freedom.
It powers the vast majority of the servers that compose the Internet. It's the base upon which everything is built. But not just that. Android is based on (a modified version of) Linux.
The Linux "core" (called a kernel) was born in 1991 in Finland, and it has come a really long way from its humble beginnings. It went on to be the kernel of the GNU Operating System, creating the duo GNU/Linux.
There's one thing about Linux that corporations like Microsoft, Apple, and Google will never be able to offer: the freedom to do whatever you want with your computer.
They're actually going in the opposite direction, building walled gardens, especially on the mobile side.
Linux is the ultimate freedom.
It is developed by volunteers, some paid by companies that rely on it, some independently. But there's no single commercial company that can dictate what goes into Linux, or the project's priorities.
You can also use Linux as your day to day computer. I use macOS because I really enjoy the applications and design (and I also used to be an iOS and Mac apps developer). But before using macOS I used Linux as my main computer Operating System.
No one can dictate which apps you can run, or "call home" with apps that track you, your position, and more.
Linux is also special because there's not just "one Linux", like is the case with Windows or macOS. Instead, we have distributions.
A "distro" is made by a company or organization and packages the Linux core with additional programs and tooling.
For example you have Debian, Red Hat, and Ubuntu, probably the most popular distributions.
But many, many more exist. You can create your own distribution, too. But most likely you'll use a popular one that has lots of users and a community of people around it. This lets you do what you need to do without losing too much time reinventing the wheel and figuring out answers to common problems.
Some desktop computers and laptops ship with Linux preinstalled. Or you can install it on your Windows-based computer, or on a Mac.
But you don't need to disrupt your existing computer just to get an idea of how Linux works.
I don't have a Linux computer.
If you use a Mac, you just need to know that under the hood macOS is a UNIX Operating System. It shares a lot of the same ideas and software that a GNU/Linux system uses, because GNU/Linux is a free alternative to UNIX.
UNIX is an umbrella term that groups many operating systems used in big corporations and institutions, starting from the 70's
The macOS terminal gives you access to the same exact commands I'll describe in the rest of this handbook.
Microsoft has an official Windows Subsystem for Linux which you can (and should!) install on Windows. This will give you the ability to run Linux in a very easy way on your PC.
But the vast majority of the time you will run a Linux computer in the cloud via a VPS (Virtual Private Server) like DigitalOcean.
What is a shell?
A shell is a command interpreter that exposes an interface to the user to work with the underlying operating system.
It allows you to execute operations using text and commands, and it provides users advanced features like being able to create scripts.
This is important: shells let you perform things in a more optimized way than a GUI (Graphical User Interface) could ever possibly let you do. Command line tools can offer many different configuration options without being too complex to use.
There are many different kind of shells. This post focuses on Unix shells, the ones that you will find commonly on Linux and macOS computers.
Many different kind of shells were created for those systems over time, and a few of them dominate the space: Bash, Csh, Zsh, Fish and many more!
All shells originate from the Bourne Shell, called sh. "Bourne" because its creator was Steve Bourne.
Bash means Bourne-again shell. sh was proprietary and not open source, and Bash was created in 1989 to create a free alternative for the GNU project and the Free Software Foundation. Since projects had to pay to use the Bourne shell, Bash became very popular.
If you use a Mac, try opening your Mac terminal. By default it runs ZSH (or, pre-Catalina, Bash).
You can set up your system to run any kind of shell – for example I use the Fish shell.
Each single shell has its own unique features and advanced usage, but they all share a common functionality: they can let you execute programs, and they can be programmed.
In the rest of this handbook we'll see in detail the most common commands you will use.
The man command
The first command I'll introduce will help you understand all the other commands.
Every time I don't know how to use a command, I type man <command> to get the manual:
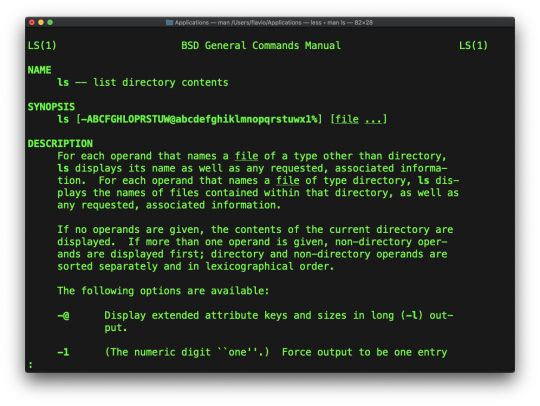
This is a man (from _manual_) page. Man pages are an essential tool to learn as a developer. They contain so much information that sometimes it's almost too much. The above screenshot is just 1 of 14 screens of explanation for the ls command.
Most of the time when I need to learn a command quickly I use this site called tldr pages: https://tldr.sh. It's a command you can install, which you then run like this: tldr <command>. It gives you a very quick overview of a command, with some handy examples of common usage scenarios:
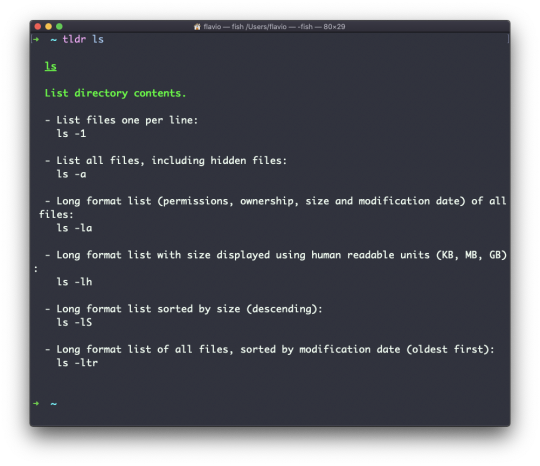
This is not a substitute for man, but a handy tool to avoid losing yourself in the huge amount of information present in a man page. Then you can use the man page to explore all the different options and parameters you can use on a command.
The Linux ls command
Inside a folder you can list all the files that the folder contains using the ls command:
ls
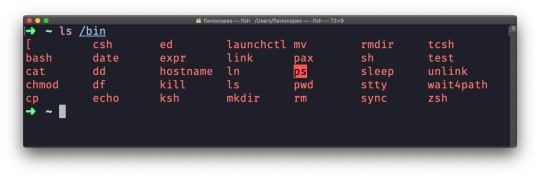
If you add a folder name or path, it will print that folder's contents:
ls /bin
ls accepts a lot of options. One of my favorite combinations is -al. Try it:
ls -al /bin
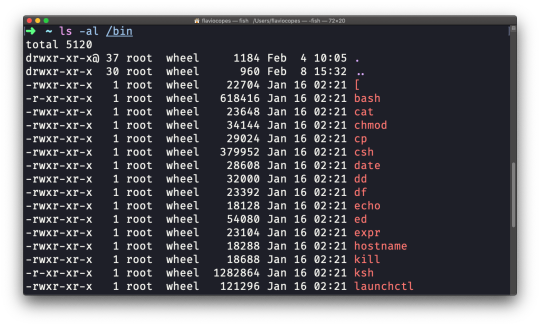
Compared to the plain ls command, this returns much more information.
You have, from left to right:
the file permissions (and if your system supports ACLs, you get an ACL flag as well)
the number of links to that file
the owner of the file
the group of the file
the file size in bytes
the file's last modified datetime
the file name
This set of data is generated by the l option. The a option instead also shows the hidden files.
Hidden files are files that start with a dot (.).
The cd command
Once you have a folder, you can move into it using the cd command. cd means change directory. You invoke it specifying a folder to move into. You can specify a folder name, or an entire path.
Example:
mkdir fruits cd fruits
Now you are in the fruits folder.
You can use the .. special path to indicate the parent folder:
cd .. #back to the home folder
The # character indicates the start of the comment, which lasts for the entire line after it's found.
You can use it to form a path:
mkdir fruits mkdir cars cd fruits cd ../cars
There is another special path indicator which is ., and indicates the current folder.
You can also use absolute paths, which start from the root folder /:
cd /etc
The pwd command
Whenever you feel lost in the filesystem, call the pwd command to know where you are:
pwd
It will print the current folder path.
The mkdir command
You create folders using the mkdir command:
mkdir fruits
You can create multiple folders with one command:
mkdir dogs cars
You can also create multiple nested folders by adding the -p option:
mkdir -p fruits/apples
Options in UNIX commands commonly take this form. You add them right after the command name, and they change how the command behaves. You can often combine multiple options, too.
You can find which options a command supports by typing man <commandname>. Try now with man mkdir for example (press the q key to esc the man page). Man pages are the amazing built-in help for UNIX.
The rmdir command
Just as you can create a folder using mkdir, you can delete a folder using rmdir:
mkdir fruits rmdir fruits
You can also delete multiple folders at once:
mkdir fruits cars rmdir fruits cars
The folder you delete must be empty.
To delete folders with files in them, we'll use the more generic rm command which deletes files and folders, using the -rf option:
rm -rf fruits cars
Be careful as this command does not ask for confirmation and it will immediately remove anything you ask it to remove.
There is no bin when removing files from the command line, and recovering lost files can be hard.
The mv command
Once you have a file, you can move it around using the mv command. You specify the file current path, and its new path:
touch test mv pear new_pear
The pear file is now moved to new_pear. This is how you rename files and folders.
If the last parameter is a folder, the file located at the first parameter path is going to be moved into that folder. In this case, you can specify a list of files and they will all be moved in the folder path identified by the last parameter:
touch pear touch apple mkdir fruits mv pear apple fruits #pear and apple moved to the fruits folder
The cp command
You can copy a file using the cp command:
touch test cp apple another_apple
To copy folders you need to add the -r option to recursively copy the whole folder contents:
mkdir fruits cp -r fruits cars
The open command
The open command lets you open a file using this syntax:
open <filename>
You can also open a directory, which on macOS opens the Finder app with the current directory open:
open <directory name>
I use it all the time to open the current directory:
open .
The special . symbol points to the current directory, as .. points to the parent directory
The same command can also be be used to run an application:
open <application name>
The touch command
You can create an empty file using the touch command:
touch apple
If the file already exists, it opens the file in write mode, and the timestamp of the file is updated.
The find command
The find command can be used to find files or folders matching a particular search pattern. It searches recursively.
Let's learn how to use it by example.
Find all the files under the current tree that have the .js extension and print the relative path of each file that matches:
find . -name '*.js'
It's important to use quotes around special characters like * to avoid the shell interpreting them.
Find directories under the current tree matching the name "src":
find . -type d -name src
Use -type f to search only files, or -type l to only search symbolic links.
-name is case sensitive. use -iname to perform a case-insensitive search.
You can search under multiple root trees:
find folder1 folder2 -name filename.txt
Find directories under the current tree matching the name "node_modules" or 'public':
find . -type d -name node_modules -or -name public
You can also exclude a path using -not -path:
find . -type d -name '*.md' -not -path 'node_modules/*'
You can search files that have more than 100 characters (bytes) in them:
find . -type f -size +100c
Search files bigger than 100KB but smaller than 1MB:
find . -type f -size +100k -size -1M
Search files edited more than 3 days ago:
find . -type f -mtime +3
Search files edited in the last 24 hours:
find . -type f -mtime -1
You can delete all the files matching a search by adding the -delete option. This deletes all the files edited in the last 24 hours:
find . -type f -mtime -1 -delete
You can execute a command on each result of the search. In this example we run cat to print the file content:
find . -type f -exec cat {} \;
Notice the terminating \;. {} is filled with the file name at execution time.
The ln command
The ln command is part of the Linux file system commands.
It's used to create links. What is a link? It's like a pointer to another file, or a file that points to another file. You might be familiar with Windows shortcuts. They're similar.
We have 2 types of links: hard links and soft links.
Hard links
Hard links are rarely used. They have a few limitations: you can't link to directories, and you can't link to external filesystems (disks).
A hard link is created using the following syntax:
ln <original> <link>
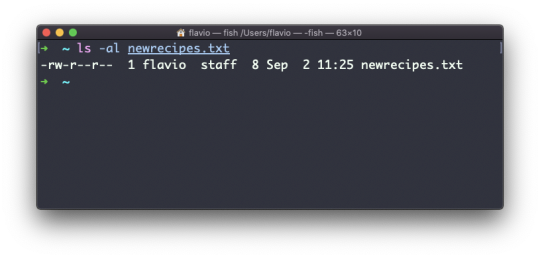
For example, say you have a file called recipes.txt. You can create a hard link to it using:
ln recipes.txt newrecipes.txt
The new hard link you created is indistinguishable from a regular file:
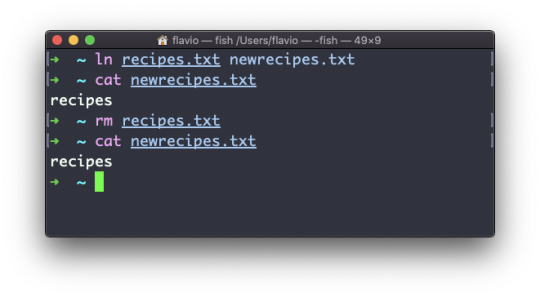
Now any time you edit any of those files, the content will be updated for both.
If you delete the original file, the link will still contain the original file content, as that's not removed until there is one hard link pointing to it.
Soft links
Soft links are different. They are more powerful as you can link to other filesystems and to directories. But keep in mind that when the original is removed, the link will be broken.
You create soft links using the -s option of ln:
ln -s <original> <link>
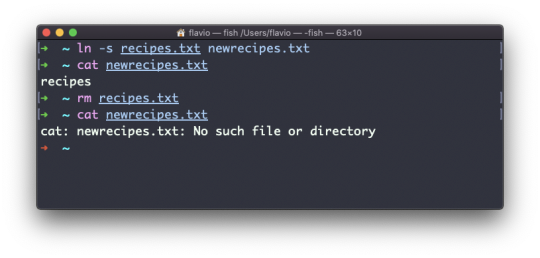
For example, say you have a file called recipes.txt. You can create a soft link to it using:
ln -s recipes.txt newrecipes.txt
In this case you can see there's a special l flag when you list the file using ls -al. The file name has a @ at the end, and it's also colored differently if you have colors enabled:
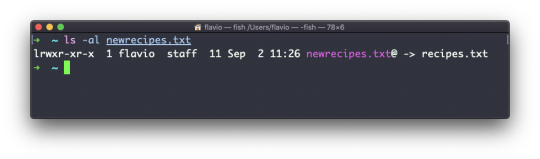
Now if you delete the original file, the links will be broken, and the shell will tell you "No such file or directory" if you try to access it:
The gzip command
You can compress a file using the gzip compression protocol named LZ77 using the gzip command.
Here's the simplest usage:
gzip filename
This will compress the file, and append a .gz extension to it. The original file is deleted.
To prevent this, you can use the -c option and use output redirection to write the output to the filename.gz file:
gzip -c filename > filename.gz
The -c option specifies that the output will go to the standard output stream, leaving the original file intact.
Or you can use the -k option:
gzip -k filename
There are various levels of compression. The more the compression, the longer it will take to compress (and decompress). Levels range from 1 (fastest, worst compression) to 9 (slowest, better compression), and the default is 6.
You can choose a specific level with the -<NUMBER> option:
gzip -1 filename
You can compress multiple files by listing them:
gzip filename1 filename2
You can compress all the files in a directory, recursively, using the -r option:
gzip -r a_folder
The -v option prints the compression percentage information. Here's an example of it being used along with the -k (keep) option:
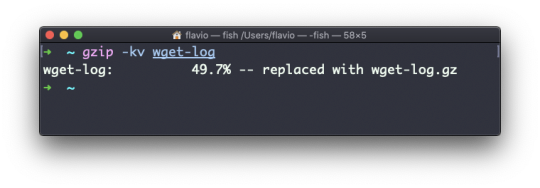
gzip can also be used to decompress a file, using the -d option:
gzip -d filename.gz
The gunzip command
The gunzip command is basically equivalent to the gzip command, except the -d option is always enabled by default.
The command can be invoked in this way:
gunzip filename.gz
This will gunzip and will remove the .gz extension, putting the result in the filename file. If that file exists, it will overwrite that.
You can extract to a different filename using output redirection using the -c option:
gunzip -c filename.gz > anotherfilename
The tar command
The tar command is used to create an archive, grouping multiple files in a single file.
Its name comes from the past and means tape archive (back when archives were stored on tapes).
This command creates an archive named archive.tar with the content of file1 and file2:
tar -cf archive.tar file1 file2
The c option stands for create. The f option is used to write to file the archive.
To extract files from an archive in the current folder, use:
tar -xf archive.tar
the x option stands for extract.
And to extract them to a specific directory, use:
tar -xf archive.tar -C directory
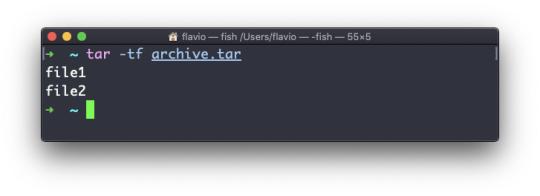
You can also just list the files contained in an archive:
tar is often used to create a compressed archive, gzipping the archive.
This is done using the z option:
tar -czf archive.tar.gz file1 file2
This is just like creating a tar archive, and then running gzip on it.
To unarchive a gzipped archive, you can use gunzip, or gzip -d, and then unarchive it. But tar -xf will recognize it's a gzipped archive, and do it for you:
tar -xf archive.tar.gz
The alias command
It's common to always run a program with a set of options that you like using.
For example, take the ls command. By default it prints very little information:
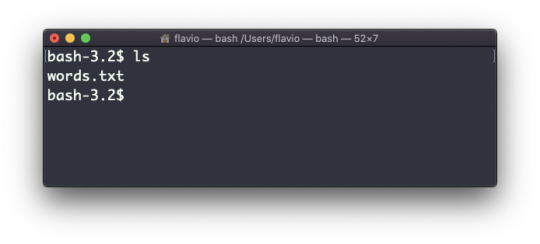
But if you use the -al option it will print something more useful, including the file modification date, the size, the owner, and the permissions. It will also list hidden files (files starting with a .):
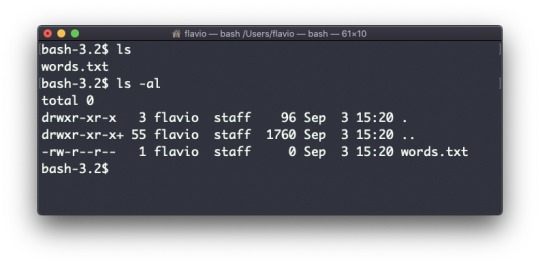
You can create a new command, for example I like to call it ll, that is an alias to ls -al.
You do it like this:
alias ll='ls -al'
Once you do, you can call ll just like it was a regular UNIX command:
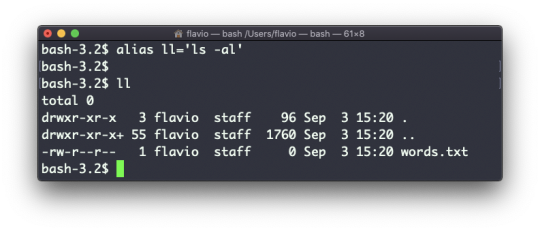
Now calling alias without any option will list the aliases defined:
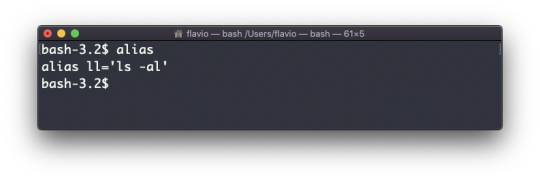
The alias will work until the terminal session is closed.
To make it permanent, you need to add it to the shell configuration. This could be ~/.bashrc or ~/.profile or ~/.bash_profile if you use the Bash shell, depending on the use case.
Be careful with quotes if you have variables in the command: if you use double quotes, the variable is resolved at definition time. If you use use single quotes, it's resolved at invocation time. Those 2 are different:
alias lsthis="ls $PWD" alias lscurrent='ls $PWD'
$PWD refers to the current folder the shell is in. If you now navigate away to a new folder, lscurrent lists the files in the new folder, whereas lsthis still lists the files in the folder where you were when you defined the alias.
The cat command
Similar to tail in some ways, we have cat. Except cat can also add content to a file, and this makes it super powerful.
In its simplest usage, cat prints a file's content to the standard output:
cat file
You can print the content of multiple files:
cat file1 file2
and using the output redirection operator > you can concatenate the content of multiple files into a new file:
cat file1 file2 > file3
Using >> you can append the content of multiple files into a new file, creating it if it does not exist:
cat file1 file2 >> file3
When you're looking at source code files it's helpful to see the line numbers. You can have cat print them using the -n option:
cat -n file1
You can only add a number to non-blank lines using -b, or you can also remove all the multiple empty lines using -s.
cat is often used in combination with the pipe operator | to feed a file's content as input to another command: cat file1 | anothercommand.
The less command
The less command is one I use a lot. It shows you the content stored inside a file, in a nice and interactive UI.
Usage: less <filename>.
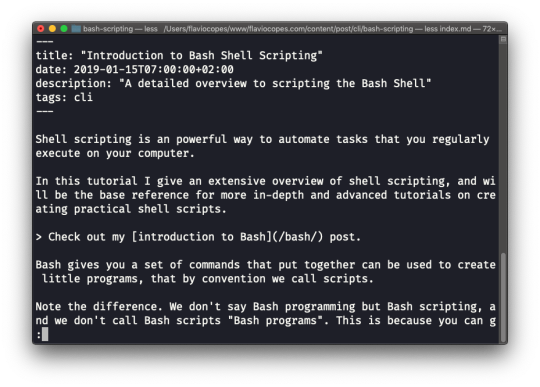
Once you are inside a less session, you can quit by pressing q.
You can navigate the file contents using the up and down keys, or using the space bar and b to navigate page by page. You can also jump to the end of the file pressing G and jump back to the start by pressing g.
You can search contents inside the file by pressing / and typing a word to search. This searches forward. You can search backwards using the ? symbol and typing a word.
This command just visualises the file's content. You can directly open an editor by pressing v. It will use the system editor, which in most cases is vim.
Pressing the F key enters follow mode, or watch mode. When the file is changed by someone else, like from another program, you get to see the changes live.
This doesn't happen by default, and you only see the file version at the time you opened it. You need to press ctrl-C to quit this mode. In this case the behaviour is similar to running the tail -f <filename> command.
You can open multiple files, and navigate through them using :n (to go to the next file) and :p (to go to the previous).
The tail command
The best use case of tail in my opinion is when called with the -f option. It opens the file at the end, and watches for file changes.
Any time there is new content in the file, it is printed in the window. This is great for watching log files, for example:
tail -f /var/log/system.log
To exit, press ctrl-C.
You can print the last 10 lines in a file:
tail -n 10 <filename>
You can print the whole file content starting from a specific line using + before the line number:
tail -n +10 <filename>
tail can do much more and as always my advice is to check man tail.
The wc command
The wc command gives us useful information about a file or input it receives via pipes.
echo test >> test.txt wc test.txt 1 1 5 test.txt
Example via pipes, we can count the output of running the ls -al command:
ls -al | wc 6 47 284
The first column returned is the number of lines. The second is the number of words. The third is the number of bytes.
We can tell it to just count the lines:
wc -l test.txt
or just the words:
wc -w test.txt
or just the bytes:
wc -c test.txt
Bytes in ASCII charsets equate to characters. But with non-ASCII charsets, the number of characters might differ because some characters might take multiple bytes (for example this happens in Unicode).
In this case the -m flag will help you get the correct value:
wc -m test.txt
The grep command
The grep command is a very useful tool. When you master it, it will help you tremendously in your day to day coding.
If you're wondering, grep stands for global regular expression print.
You can use grep to search in files, or combine it with pipes to filter the output of another command.
For example here's how we can find the occurences of the document.getElementById line in the index.md file:
grep -n document.getElementById index.md
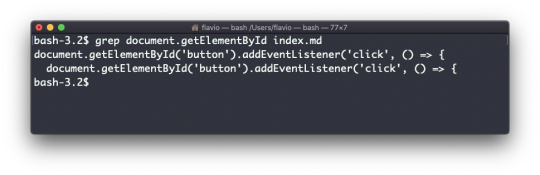
Using the -n option it will show the line numbers:
grep -n document.getElementById index.md
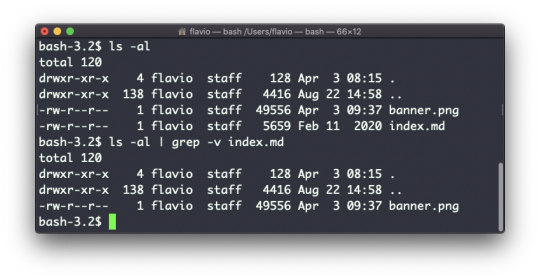
One very useful thing is to tell grep to print 2 lines before and 2 lines after the matched line to give you more context. That's done using the -C option, which accepts a number of lines:
grep -nC 2 document.getElementById index.md
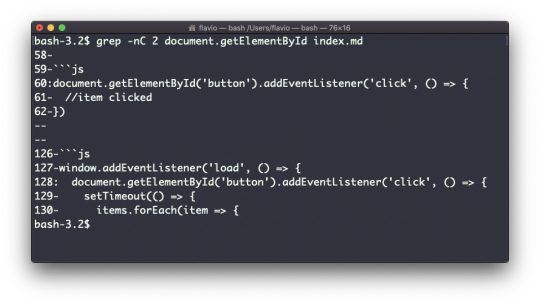
Search is case sensitive by default. Use the -i flag to make it insensitive.
As mentioned, you can use grep to filter the output of another command. We can replicate the same functionality as above using:
less index.md | grep -n document.getElementById
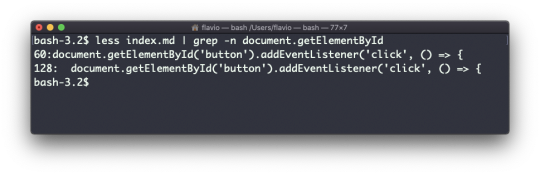
The search string can be a regular expression, and this makes grep very powerful.
Another thing you might find very useful is to invert the result, excluding the lines that match a particular string, using the -v option:
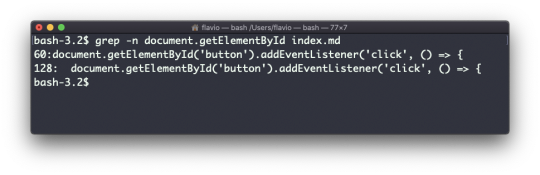
The sort command
Suppose you have a text file which contains the names of dogs:
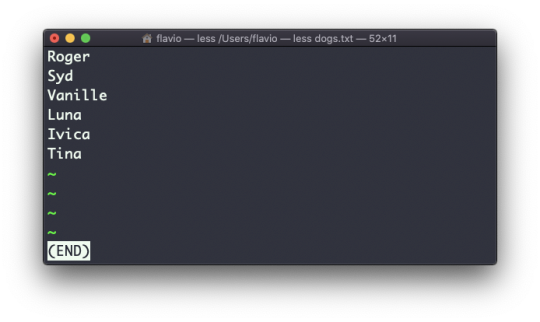
This list is unordered.
The sort command helps you sort them by name:
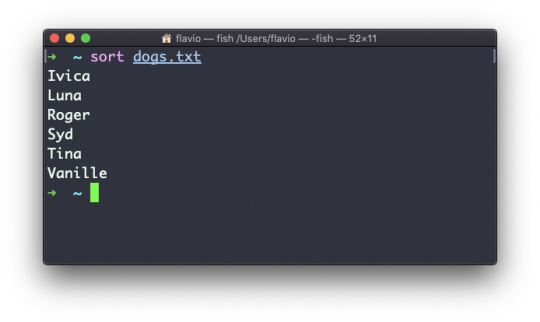
Use the r option to reverse the order:
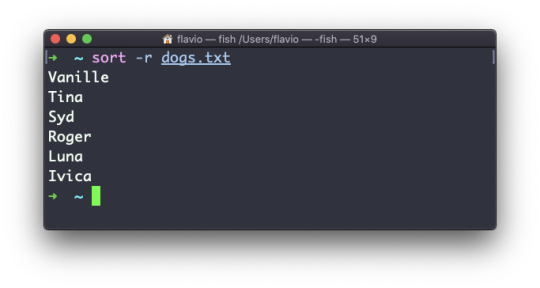
Sorting by default is case sensitive, and alphabetic. Use the --ignore-case option to sort case insensitive, and the -n option to sort using a numeric order.
If the file contains duplicate lines:
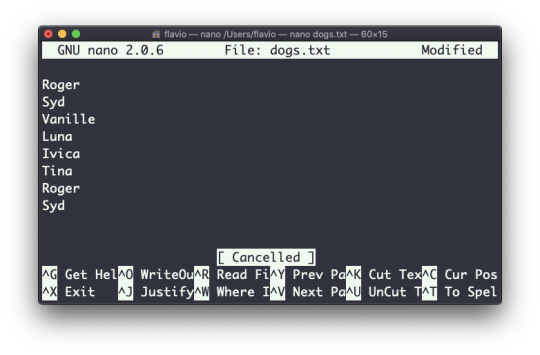
You can use the -u option to remove them:
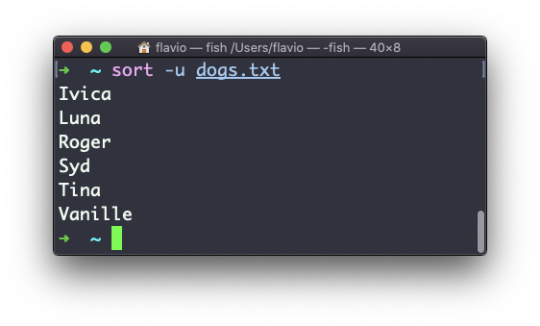
sort does not just work on files, as many UNIX commands do – it also works with pipes. So you can use it on the output of another command. For example you can order the files returned by ls with:
ls | sort
sort is very powerful and has lots more options, which you can explore by calling man sort.

The uniq command
uniq is a command that helps you sort lines of text.
You can get those lines from a file, or using pipes from the output of another command:
uniq dogs.txt ls | uniq
You need to consider this key thing: uniq will only detect adjacent duplicate lines.
This implies that you will most likely use it along with sort:
sort dogs.txt | uniq
The sort command has its own way to remove duplicates with the -u (unique) option. But uniq has more power.
By default it removes duplicate lines:
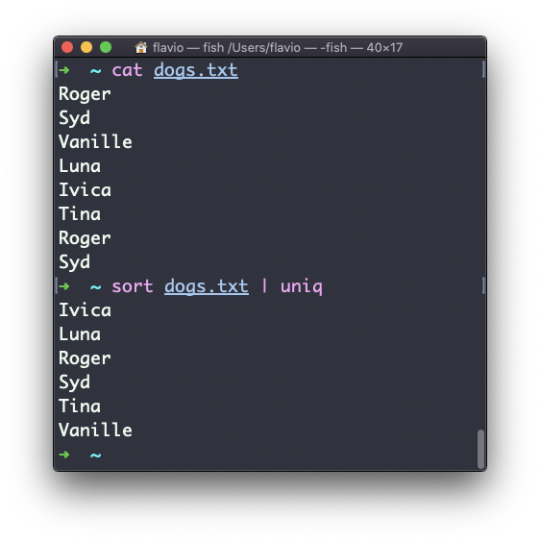
You can tell it to only display duplicate lines, for example, with the -d option:
sort dogs.txt | uniq -d
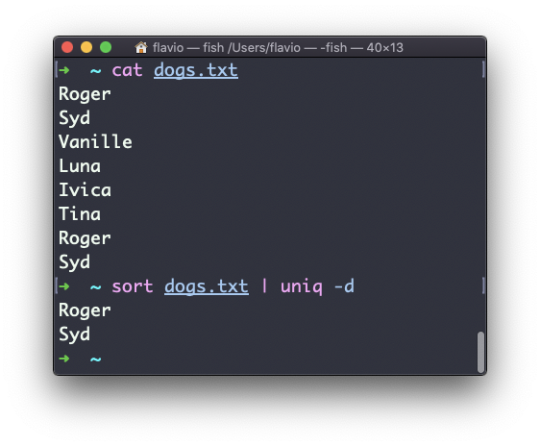
You can use the -u option to only display non-duplicate lines:
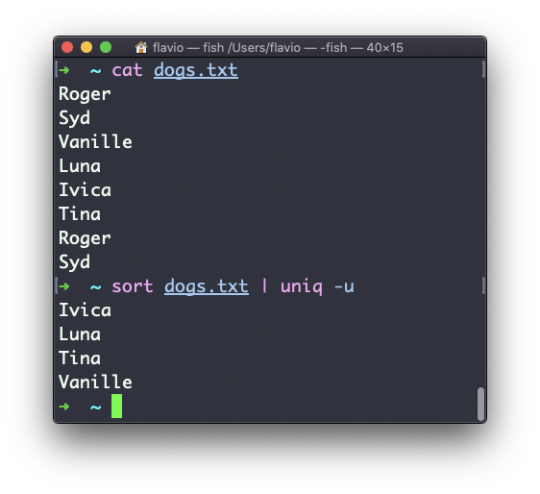
You can count the occurrences of each line with the -c option:
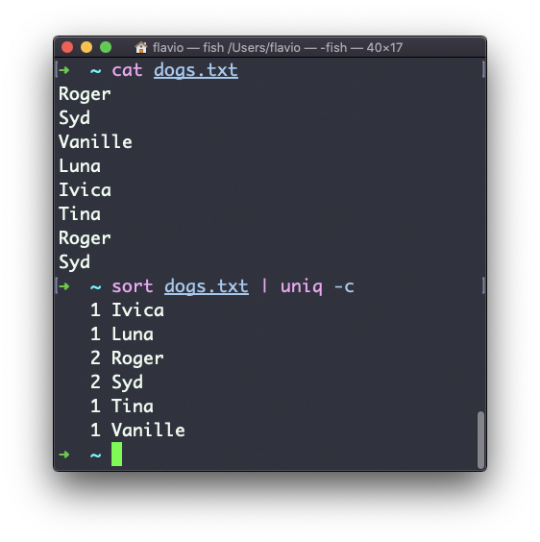
Use the special combination:
sort dogs.txt | uniq -c | sort -nr
to then sort those lines by most frequent:
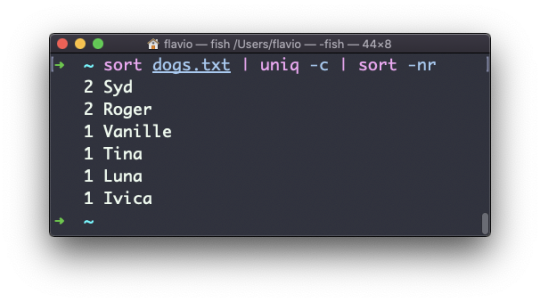
The diff command
diff is a handy command. Suppose you have 2 files, which contain almost the same information, but you can't find the difference between the two.
diff will process the files and will tell you what's the difference.
Suppose you have 2 files: dogs.txt and moredogs.txt. The difference is that moredogs.txt contains one more dog name:
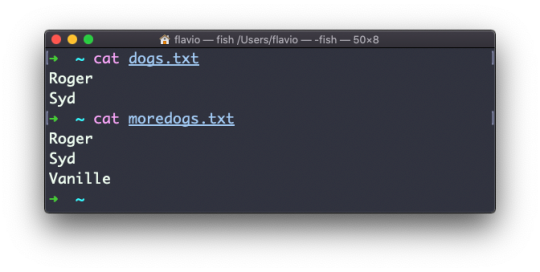
diff dogs.txt moredogs.txt will tell you the second file has one more line, line 3 with the line Vanille:
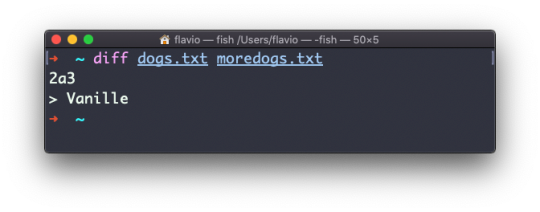
If you invert the order of the files, it will tell you that the second file is missing line 3, whose content is Vanille:
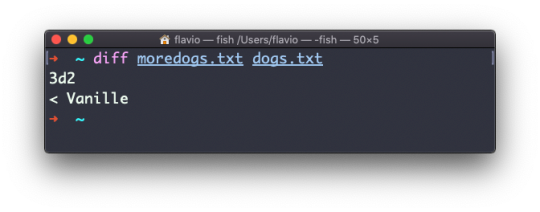
Using the -y option will compare the 2 files line by line:
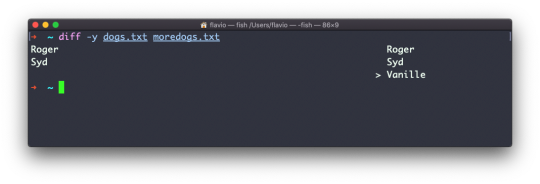
The -u option however will be more familiar to you, because that's the same used by the Git version control system to display differences between versions:

Comparing directories works in the same way. You must use the -r option to compare recursively (going into subdirectories):
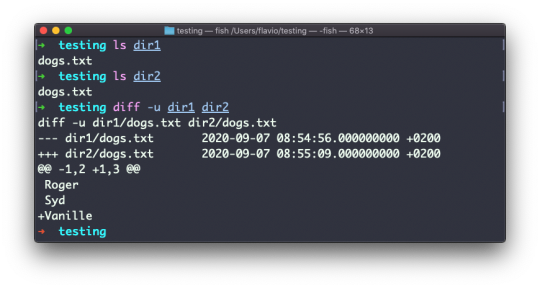
In case you're interested in which files differ, rather than the content, use the r and q options:
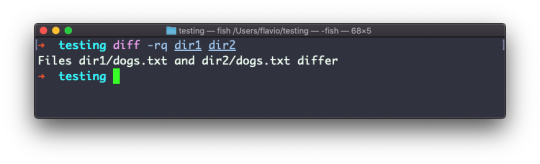
There are many more options you can explore in the man page by running man diff:
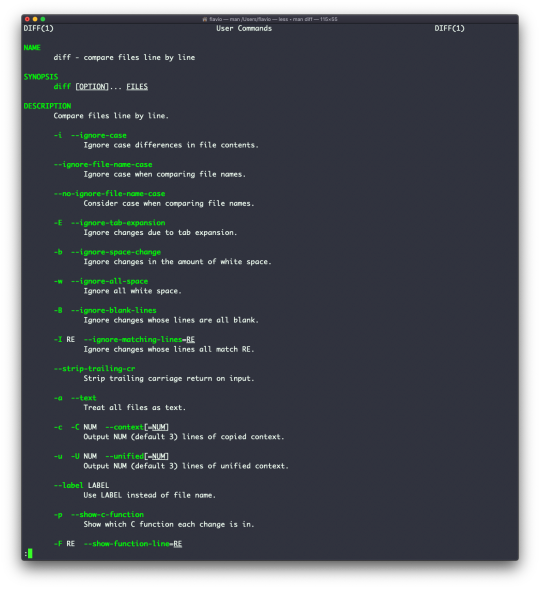
The echo command
The echo command does one simple job: it prints to the output the argument passed to it.
This example:
echo "hello"
will print hello to the terminal.
We can append the output to a file:
echo "hello" >> output.txt
We can interpolate environment variables:
echo "The path variable is $PATH"
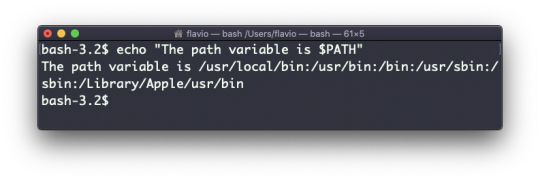
Beware that special characters need to be escaped with a backslash \. $ for example:
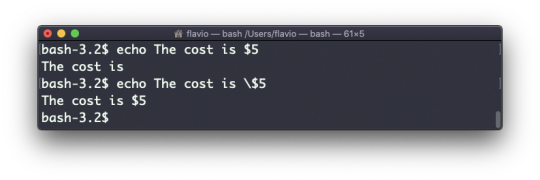
This is just the start. We can do some nice things when it comes to interacting with the shell features.
We can echo the files in the current folder:
echo *
We can echo the files in the current folder that start with the letter o:
echo o*
Any valid Bash (or any shell you are using) command and feature can be used here.
You can print your home folder path:
echo ~
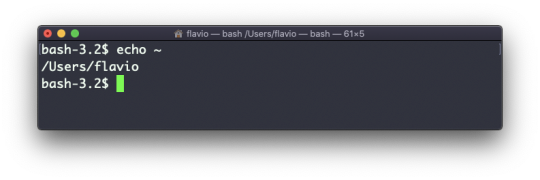
You can also execute commands, and print the result to the standard output (or to file, as you saw):
echo $(ls -al)
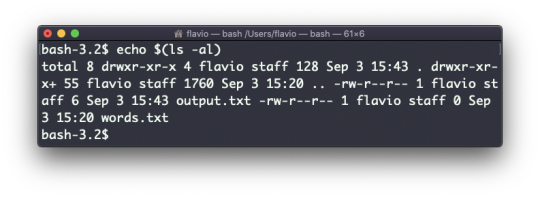
Note that whitespace is not preserved by default. You need to wrap the command in double quotes to do so:
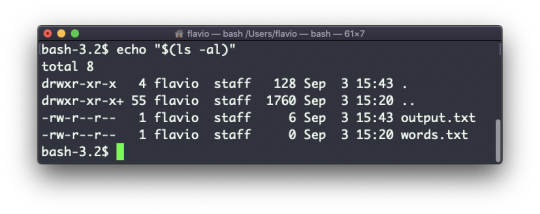
You can generate a list of strings, for example ranges:
echo {1..5}
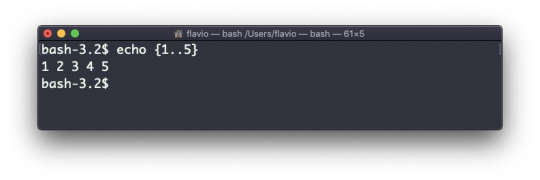
The chown command
Every file/directory in an Operating System like Linux or macOS (and every UNIX system in general) has an owner.
The owner of a file can do everything with it. It can decide the fate of that file.
The owner (and the root user) can change the owner to another user, too, using the chown command:
chown <owner> <file>
Like this:
chown flavio test.txt
For example if you have a file that's owned by root, you can't write to it as another user:
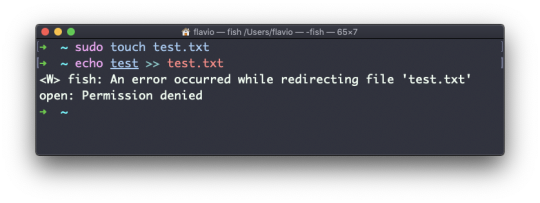
You can use chown to transfer the ownership to you:

It's rather common to need to change the ownership of a directory, and recursively all the files contained, plus all the subdirectories and the files contained in them, too.
You can do so using the -R flag:
chown -R <owner> <file>
Files/directories don't just have an owner, they also have a group. Through this command you can change that simultaneously while you change the owner:
chown <owner>:<group> <file>
Example:
chown flavio:users test.txt
You can also just change the group of a file using the chgrp command:
chgrp <group> <filename>
The chmod command
Every file in the Linux / macOS Operating Systems (and UNIX systems in general) has 3 permissions: read, write, and execute.
Go into a folder, and run the ls -al command.
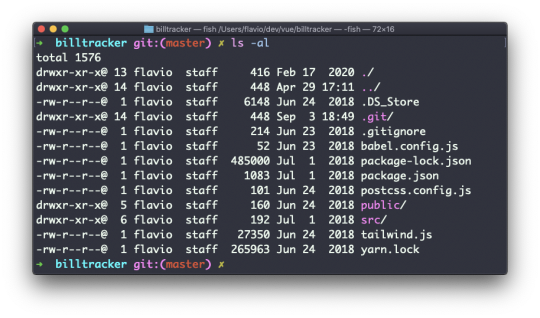
The weird strings you see on each file line, like drwxr-xr-x, define the permissions of the file or folder.
Let's dissect it.
The first letter indicates the type of file:
- means it's a normal file
d means it's a directory
l means it's a link
Then you have 3 sets of values:
The first set represents the permissions of the owner of the file
The second set represents the permissions of the members of the group the file is associated to
The third set represents the permissions of the everyone else
Those sets are composed by 3 values. rwx means that specific persona has read, write and execution access. Anything that is removed is swapped with a -, which lets you form various combinations of values and relative permissions: rw-, r--, r-x, and so on.
You can change the permissions given to a file using the chmod command.
chmod can be used in 2 ways. The first is using symbolic arguments, the second is using numeric arguments. Let's start with symbols first, which is more intuitive.
You type chmod followed by a space, and a letter:
a stands for all
u stands for user
g stands for group
o stands for others
Then you type either + or - to add a permission, or to remove it. Then you enter one or more permission symbols (r, w, x).
All followed by the file or folder name.
Here are some examples:
chmod a+r filename #everyone can now read chmod a+rw filename #everyone can now read and write chmod o-rwx filename #others (not the owner, not in the same group of the file) cannot read, write or execute the file
You can apply the same permissions to multiple personas by adding multiple letters before the +/-:
chmod og-r filename #other and group can't read any more
In case you are editing a folder, you can apply the permissions to every file contained in that folder using the -r (recursive) flag.
Numeric arguments are faster but I find them hard to remember when you are not using them day to day. You use a digit that represents the permissions of the persona. This number value can be a maximum of 7, and it's calculated in this way:
1 if has execution permission
2 if has write permission
4 if has read permission
This gives us 4 combinations:
0 no permissions
1 can execute
2 can write
3 can write, execute
4 can read
5 can read, execute
6 can read, write
7 can read, write and execute
We use them in pairs of 3, to set the permissions of all the 3 groups altogether:
chmod 777 filename chmod 755 filename chmod 644 filename
The umask command
When you create a file, you don't have to decide permissions up front. Permissions have defaults.
Those defaults can be controlled and modified using the umask command.
Typing umask with no arguments will show you the current umask, in this case 0022:
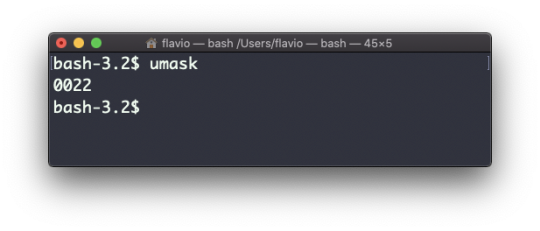
What does 0022 mean? That's an octal value that represents the permissions.
Another common value is 0002.
Use umask -S to see a human-readable notation:
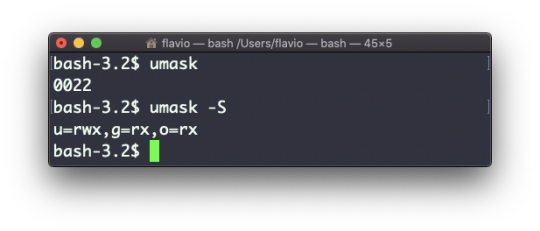
In this case, the user (u), owner of the file, has read, write and execution permissions on files.
Other users belonging to the same group (g) have read and execution permission, same as all the other users (o).
In the numeric notation, we typically change the last 3 digits.
Here's a list that gives a meaning to the number:
0 read, write, execute
1 read and write
2 read and execute
3 read only
4 write and execute
5 write only
6 execute only
7 no permissions
Note that this numeric notation differs from the one we use in chmod.
We can set a new value for the mask setting the value in numeric format:
umask 002
or you can change a specific role's permission:
umask g+r
The du command
The du command will calculate the size of a directory as a whole:
du
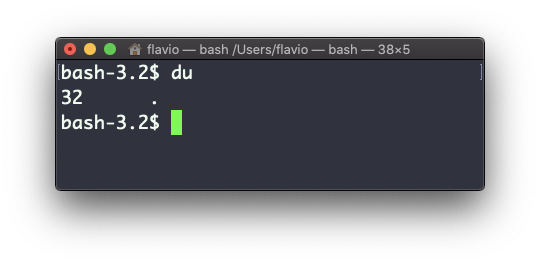
The 32 number here is a value expressed in bytes.
Running du * will calculate the size of each file individually:
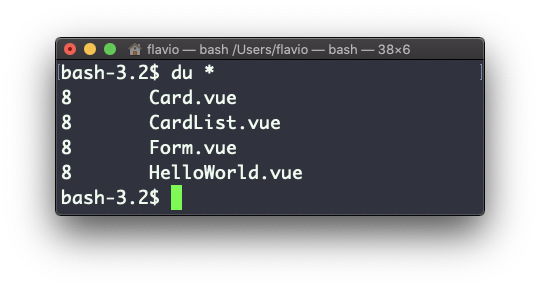
You can set du to display values in MegaBytes using du -m, and GigaBytes using du -g.
The -h option will show a human-readable notation for sizes, adapting to the size:
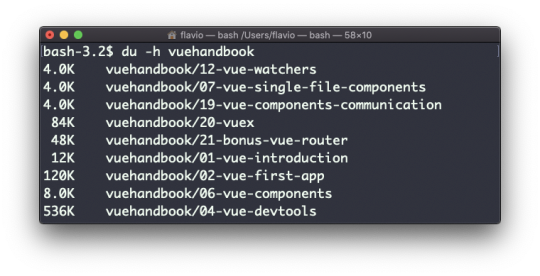
Adding the -a option will print the size of each file in the directories, too:
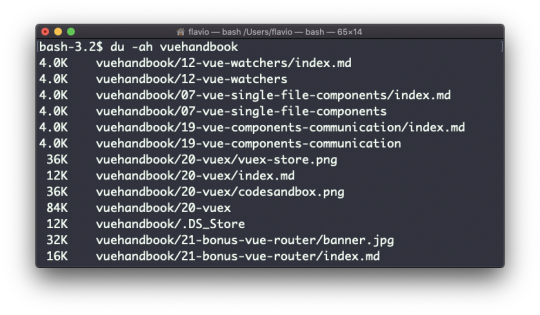
A handy thing is to sort the directories by size:
du -h <directory> | sort -nr
and then piping to head to only get the first 10 results:
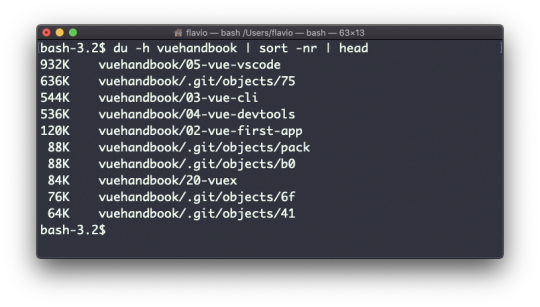
The df command
The df command is used to get disk usage information.
Its basic form will print information about the volumes mounted:
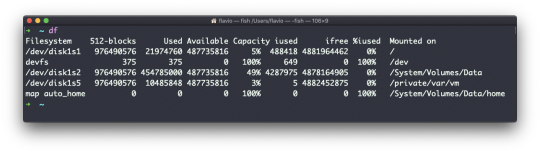
Using the -h option (df -h) will show those values in a human-readable format:

You can also specify a file or directory name to get information about the specific volume it lives on:
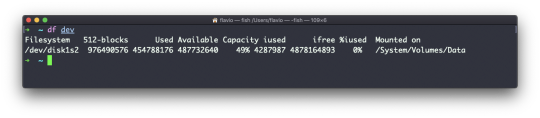
The basename command
Suppose you have a path to a file, for example /Users/flavio/test.txt.
Running
basename /Users/flavio/test.txt
will return the text.txt string:
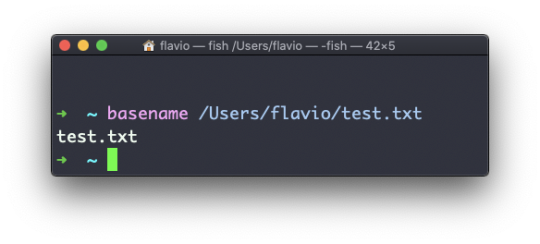
If you run basename on a path string that points to a directory, you will get the last segment of the path. In this example, /Users/flavio is a directory:
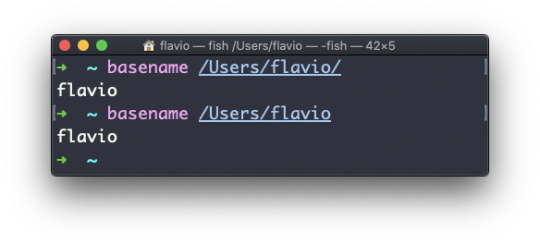
The dirname command
Suppose you have a path to a file, for example /Users/flavio/test.txt.
Running
dirname /Users/flavio/test.txt
will return the /Users/flavio string:
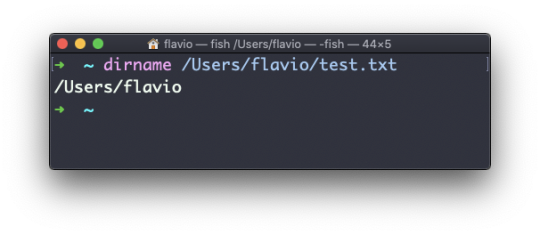
The ps command
Your computer is running tons of different processes at all times.
You can inspect them all using the ps command:
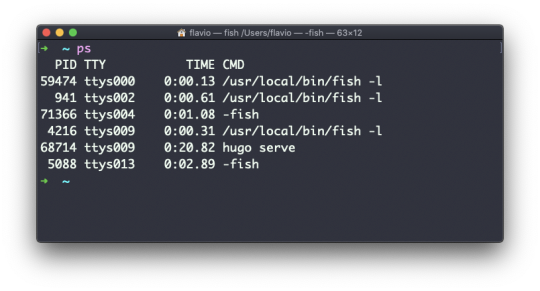
This is the list of user-initiated processes currently running in the current session.
Here I have a few fish shell instances, mostly opened by VS Code inside the editor, and an instance of Hugo running the development preview of a site.
Those are just the commands assigned to the current user. To list all processes we need to pass some options to ps.
The most common one I use is ps ax:
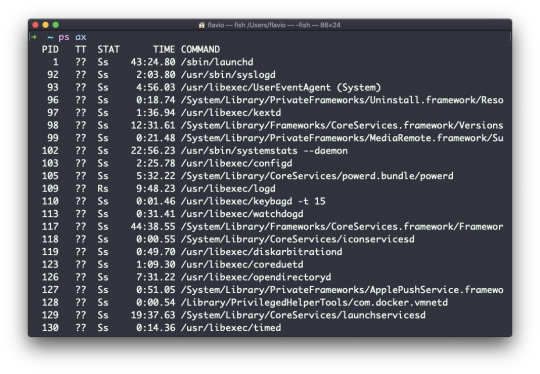
The a option is used to also list other users' processes, not just your own. x shows processes not linked to any terminal (not initiated by users through a terminal).
As you can see, the longer commands are cut. Use the command ps axww to continue the command listing on a new line instead of cutting it:

We need to specify w 2 times to apply this setting (it's not a typo).
You can search for a specific process combining grep with a pipe, like this:
ps axww | grep "Visual Studio Code"
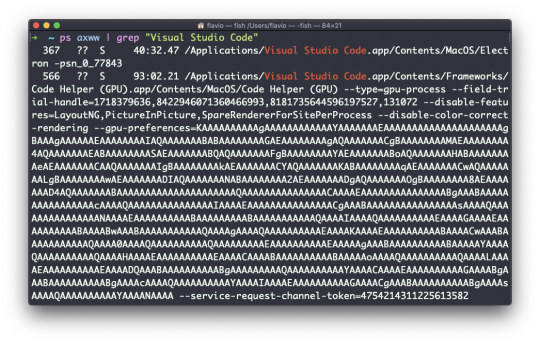
The columns returned by ps represent some key information.
The first information is PID, the process ID. This is key when you want to reference this process in another command, for example to kill it.
Then we have TT that tells us the terminal id used.
Then STAT tells us the state of the process:
I a process that is idle (sleeping for longer than about 20 seconds) R a runnable process S a process that is sleeping for less than about 20 seconds T a stopped process U a process in uninterruptible wait Z a dead process (a zombie)
If you have more than one letter, the second represents further information, which can be very technical.
It's common to have + which indicates that the process is in the foreground in its terminal. s means the process is a session leader.
TIME tells us how long the process has been running.
The top command
The top command is used to display dynamic real-time information about running processes in the system.
It's really handy to understand what is going on.
Its usage is simple – you just type top, and the terminal will be fully immersed in this new view:

The process is long-running. To quit, you can type the q letter or ctrl-C.
There's a lot of information being given to us: the number of processes, how many are running or sleeping, the system load, the CPU usage, and a lot more.
Below, the list of processes taking the most memory and CPU is constantly updated.
By default, as you can see from the %CPU column highlighted, they are sorted by the CPU used.
You can add a flag to sort processes by memory utilized:
top -o mem
The kill command
Linux processes can receive signals and react to them.
That's one way we can interact with running programs.
The kill program can send a variety of signals to a program.
It's not just used to terminate a program, like the name would suggest, but that's its main job.
We use it in this way:
kill <PID>
By default, this sends the TERM signal to the process id specified.
We can use flags to send other signals, including:
kill -HUP <PID> kill -INT <PID> kill -KILL <PID> kill -TERM <PID> kill -CONT <PID> kill -STOP <PID>
HUP means hang up. It's sent automatically when a terminal window that started a process is closed before terminating the process.
INT means interrupt, and it sends the same signal used when we press ctrl-C in the terminal, which usually terminates the process.
KILL is not sent to the process, but to the operating system kernel, which immediately stops and terminates the process.
TERM means terminate. The process will receive it and terminate itself. It's the default signal sent by kill.
CONT means continue. It can be used to resume a stopped process.
STOP is not sent to the process, but to the operating system kernel, which immediately stops (but does not terminate) the process.
You might see numbers used instead, like kill -1 <PID>. In this case,
1 corresponds to HUP. 2 corresponds to INT. 9 corresponds to KILL. 15 corresponds to TERM. 18 corresponds to CONT. 15 corresponds to STOP.
The killall command
Similar to the kill command, killall will send the signal to multiple processes at once instead of sending a signal to a specific process id.
This is the syntax:
killall <name>
where name is the name of a program. For example you can have multiple instances of the top program running, and killall top will terminate them all.
You can specify the signal, like with kill (and check the kill tutorial to read more about the specific kinds of signals we can send), for example:
killall -HUP top
The jobs command
When we run a command in Linux / macOS, we can set it to run in the background using the & symbol after the command.
For example we can run top in the background:
top &
This is very handy for long-running programs.
We can get back to that program using the fg command. This works fine if we just have one job in the background, otherwise we need to use the job number: fg 1, fg 2 and so on.
To get the job number, we use the jobs command.
Say we run top & and then top -o mem &, so we have 2 top instances running. jobs will tell us this:

Now we can switch back to one of those using fg <jobid>. To stop the program again we can hit cmd-Z.
Running jobs -l will also print the process id of each job.
The bg command
When a command is running you can suspend it using ctrl-Z.
The command will immediately stop, and you get back to the shell terminal.
You can resume the execution of the command in the background, so it will keep running but it will not prevent you from doing other work in the terminal.
In this example I have 2 commands stopped:

I can run bg 1 to resume in the background the execution of the job #1.
I could have also said bg without any option, as the default is to pick the job #1 in the list.
The fg command
When a command is running in the background, because you started it with & at the end (example: top & or because you put it in the background with the bg command), you can put it to the foreground using fg.
Running
fg
will resume in the foreground the last job that was suspended.
You can also specify which job you want to resume to the foreground passing the job number, which you can get using the jobs command.
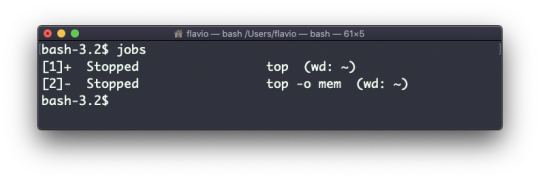
Running fg 2 will resume job #2:
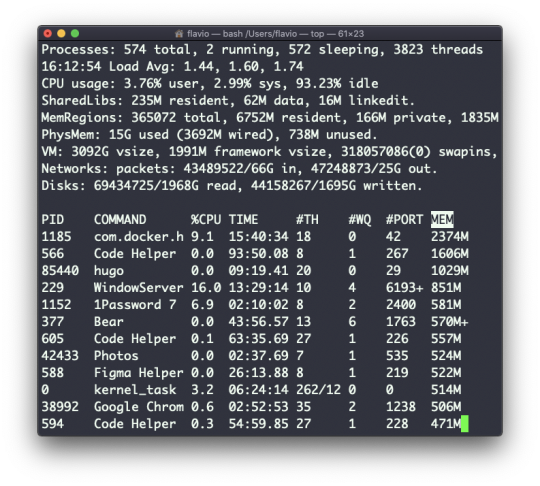
The type command
A command can be one of those 4 types:
an executable
a shell built-in program
a shell function
an alias
The type command can help figure this out, in case we want to know or we're just curious. It will tell you how the command will be interpreted.
The output will depend on the shell used. This is Bash:
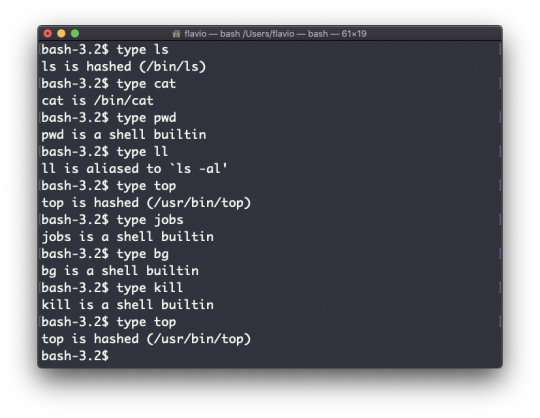
This is Zsh:
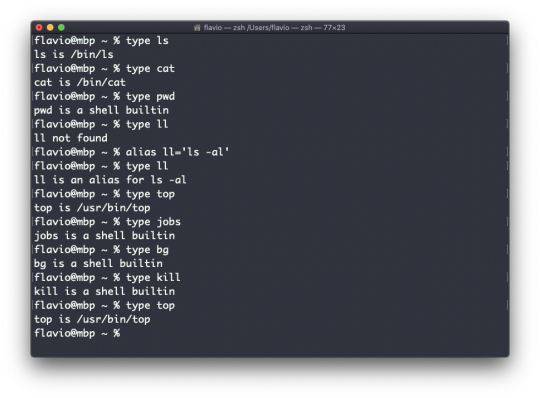
This is Fish:
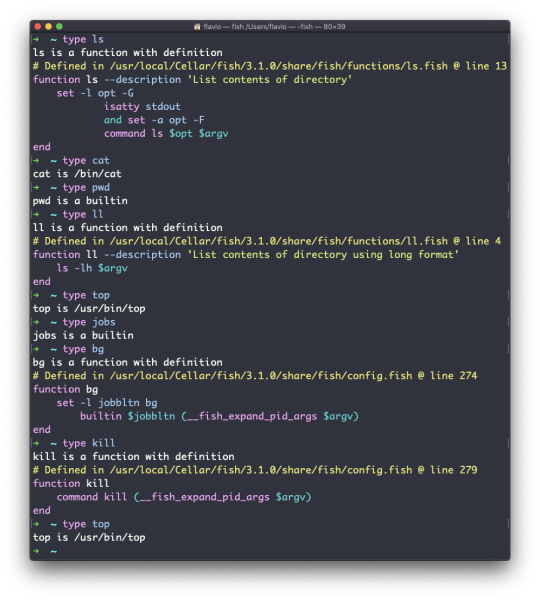
One of the most interesting things here is that for aliases it will tell you what it is aliasing to. You can see the ll alias, in the case of Bash and Zsh, but Fish provides it by default, so it will tell you it's a built-in shell function.
The which command
Suppose you have a command you can execute, because it's in the shell path, but you want to know where it is located.
You can do so using which. The command will return the path to the command specified:
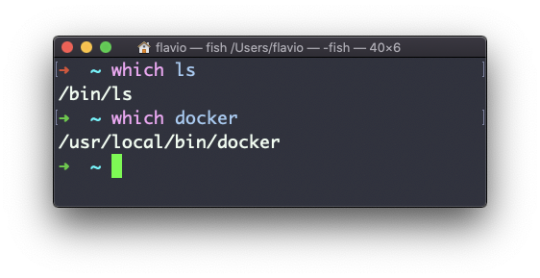
which will only work for executables stored on disk, not aliases or built-in shell functions.
The nohup command
Sometimes you have to run a long-lived process on a remote machine, and then you need to disconnect.
Or you simply want to prevent the command from being halted if there's any network issue between you and the server.
The way to make a command run even after you log out or close the session to a server is to use the nohup command.
Use nohup <command> to let the process continue working even after you log out.
The xargs command
The xargs command is used in a UNIX shell to convert input from standard input into arguments to a command.
In other words, through the use of xargs the output of a command is used as the input of another command.
Here's the syntax you will use:
command1 | xargs command2
We use a pipe (|) to pass the output to xargs. That will take care of running the command2 command, using the output of command1 as its argument(s).
Let's do a simple example. You want to remove some specific files from a directory. Those files are listed inside a text file.
We have 3 files: file1, file2, file3.
In todelete.txt we have a list of files we want to delete, in this example file1 and file3:
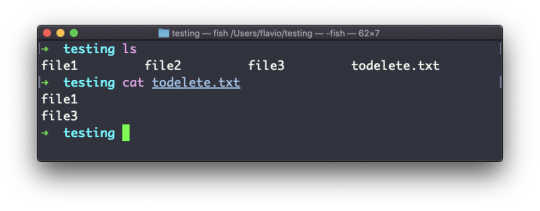
We will channel the output of cat todelete.txt to the rm command, through xargs.
In this way:
cat todelete.txt | xargs rm
That's the result, the files we listed are now deleted:
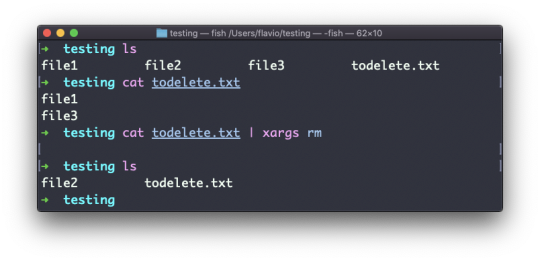
The way it works is that xargs will run rm 2 times, one for each line returned by cat.
This is the simplest usage of xargs. There are several options we can use.
One of the most useful, in my opinion (especially when starting to learn xargs), is -p. Using this option will make xargs print a confirmation prompt with the action it's going to take:
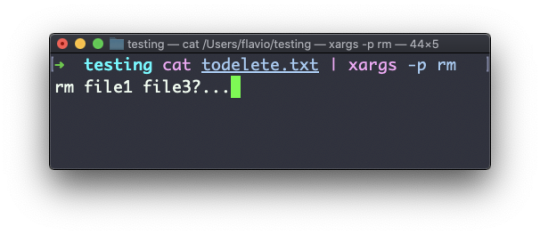
The -n option lets you tell xargs to perform one iteration at a time, so you can individually confirm them with -p. Here we tell xargs to perform one iteration at a time with -n1:
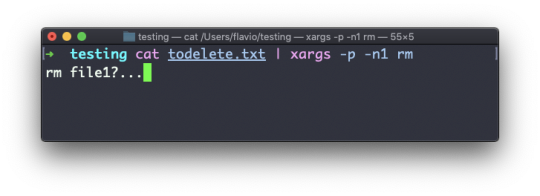
The -I option is another widely used one. It allows you to get the output into a placeholder, and then you can do various things.
One of them is to run multiple commands:
command1 | xargs -I % /bin/bash -c 'command2 %; command3 %'
You can swap the % symbol I used above with anything else – it's a variable.
The vim editor
vim is a very popular file editor, especially among programmers. It's actively developed and frequently updated, and there's a big community around it. There's even a Vim conference!
vi in modern systems is just an alias for vim, which means vi improved.
You start it by running vi on the command line.
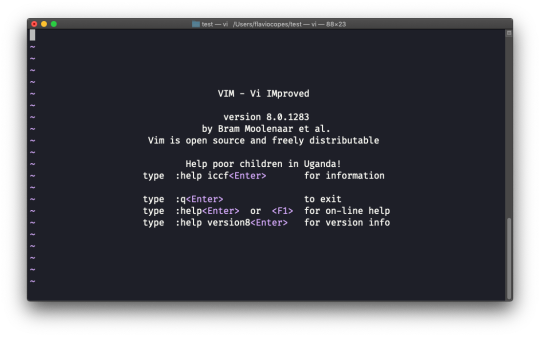
You can specify a filename at invocation time to edit that specific file:
vi test.txt
You have to know that Vim has 2 main modes:
command (or normal) mode
insert mode
When you start the editor, you are in command mode. You can't enter text like you expect from a GUI-based editor. You have to enter insert mode.
You can do this by pressing the i key. Once you do so, the -- INSERT -- word appears at the bottom of the editor:
Now you can start typing and filling the screen with the file contents:
You can move around the file with the arrow keys, or using the h - j - k - l keys. h-l for left-right, j-k for down-up.
Once you are done editing you can press the esc key to exit insert mode and go back to command mode.
At this point you can navigate the file, but you can't add content to it (and be careful which keys you press, as they might be commands).
One thing you might want to do now is save the file. You can do so by pressing : (colon), then w.
You can save and quit by pressing : then w and q: :wq
You can quit without saving by pressing : then q and !: :q!
You can undo and edit by going to command mode and pressing u. You can redo (cancel an undo) by pressing ctrl-r.
Those are the basics of working with Vim. From here starts a rabbit hole we can't go into in this little introduction.
I will only mention those commands that will get you started editing with Vim:
pressing the x key deletes the character currently highlighted
pressing A goes to the end of the currently selected line
press 0 to go to the start of the line
go to the first character of a word and press d followed by w to delete that word. If you follow it with e instead of w, the white space before the next word is preserved
use a number between d and w to delete more than 1 word, for example use d3w to delete 3 words forward
press d followed by d to delete a whole entire line. Press d followed by $ to delete the entire line from where the cursor is, until the end
To find out more about Vim I can recommend the Vim FAQ. You can also run the vimtutor command, which should already be installed in your system and will greatly help you start your vim exploration.
The emacs editor
emacs is an awesome editor and it's historically regarded as the editor for UNIX systems. Famously, vi vs emacs flame wars and heated discussions have caused many unproductive hours for developers around the world.
emacs is very powerful. Some people use it all day long as a kind of operating system (https://news.ycombinator.com/item?id=19127258). We'll just talk about the basics here.
You can open a new emacs session simply by invoking emacs:
macOS users, stop a second now. If you are on Linux there are no problems, but macOS does not ship applications using GPLv3, and every built-in UNIX command that has been updated to GPLv3 has not been updated.
While there is a little problem with the commands I listed up to now, in this case using an emacs version from 2007 is not exactly the same as using a version with 12 years of improvements and change.
This is not a problem with Vim, which is up to date. To fix this, run brew install emacs and running emacs will use the new version from Homebrew (make sure you have Homebrew installed).
You can also edit an existing file by calling emacs <filename>:
You can now start editing. Once you are done, press ctrl-x followed by ctrl-w. You confirm the folder:
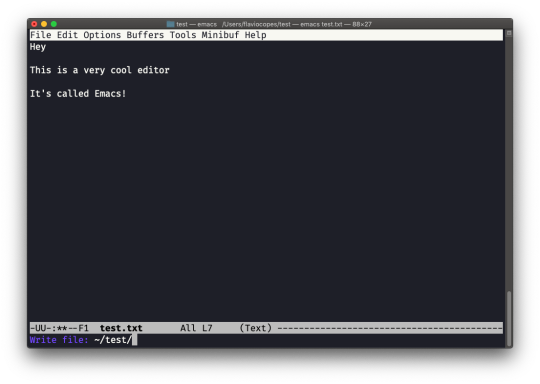
and Emacs tells you the file exists, asking you if it should overwrite it:
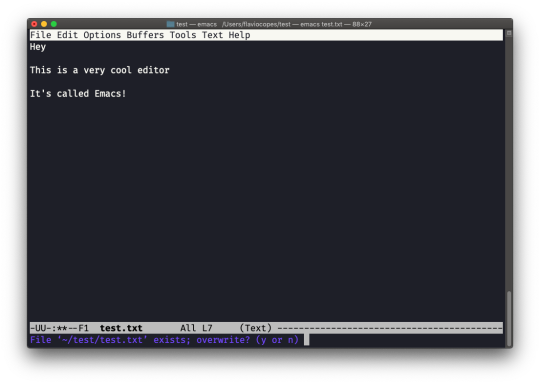
Answer y, and you get a confirmation of success:

You can exit Emacs by pressing ctrl-x followed by ctrl-c. Or ctrl-x followed by c (keep ctrl pressed).
There is a lot to know about Emacs, certainly more than I am able to write in this little introduction. I encourage you to open Emacs and press ctrl-h r to open the built-in manual and ctrl-h t to open the official tutorial.
The nano editor
nano is a beginner friendly editor.
Run it using nano <filename>.
You can directly type characters into the file without worrying about modes.
You can quit without editing using ctrl-X. If you edited the file buffer, the editor will ask you for confirmation and you can save the edits, or discard them.
The help at the bottom shows you the keyboard commands that let you work with the file:
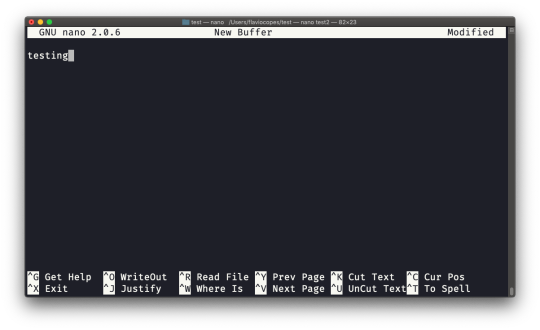
pico is more or less the same, although nano is the GNU version of pico which at some point in history was not open source. The nano clone was made to satisfy the GNU operating system license requirements.
The whoami command
Type whoami to print the user name currently logged in to the terminal session:

Note: this is different from the who am i command, which prints more information
The who command
The who command displays the users logged in to the system.
Unless you're using a server multiple people have access to, chances are you will be the only user logged in, multiple times:
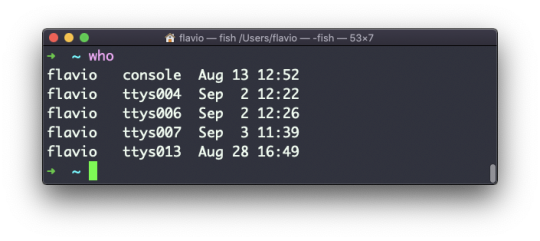
Why multiple times? Because each shell opened will count as an access.
You can see the name of the terminal used, and the time/day the session was started.
The -aH flags will tell who to display more information, including the idle time and the process ID of the terminal:
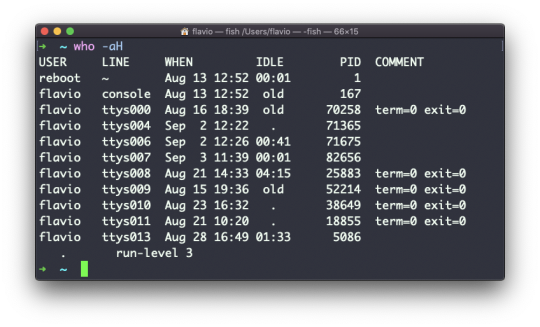
The special who am i command will list the current terminal session details:
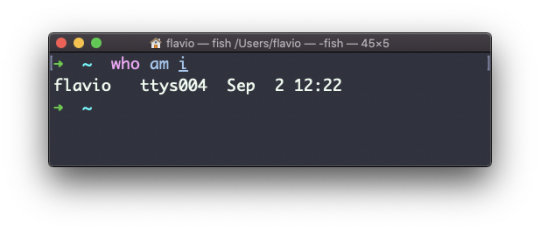
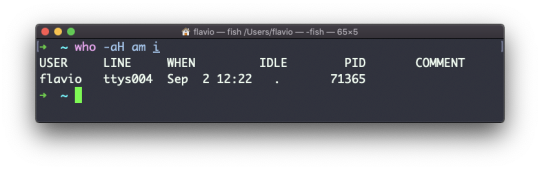
The su command
While you're logged in to the terminal shell with one user, you might need to switch to another user.
For example you're logged in as root to perform some maintenance, but then you want to switch to a user account.
You can do so with the su command:
su <username>
For example: su flavio.
If you're logged in as a user, running su without anything else will prompt you to enter the root user password, as that's the default behavior.
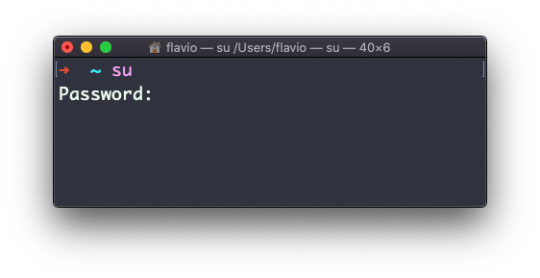
su will start a new shell as another user.
When you're done, typing exit in the shell will close that shell, and will return you back to the current user's shell.
The sudo command
sudo is commonly used to run a command as root.
You must be enabled to use sudo, and once you are, you can run commands as root by entering your user's password (not the root user password).
The permissions are highly configurable, which is great especially in a multi-user server environment. Some users can be granted access to running specific commands through sudo.
For example you can edit a system configuration file:
sudo nano /etc/hosts
which would otherwise fail to save since you don't have the permissions for it.
You can run sudo -i to start a shell as root:
You can use sudo to run commands as any user. root is the default, but use the -u option to specify another user:
sudo -u flavio ls /Users/flavio
The passwd command
Users in Linux have a password assigned. You can change the password using the passwd command.
There are two situations here.
The first is when you want to change your password. In this case you type:
passwd
and an interactive prompt will ask you for the old password, then it will ask you for the new one:
When you're root (or have superuser privileges) you can set the username for which you want to change the password:
passwd <username> <new password>
In this case you don't need to enter the old one.
The ping command
The ping command pings a specific network host, on the local network or on the Internet.
You use it with the syntax ping <host> where <host> could be a domain name, or an IP address.
Here's an example pinging google.com:
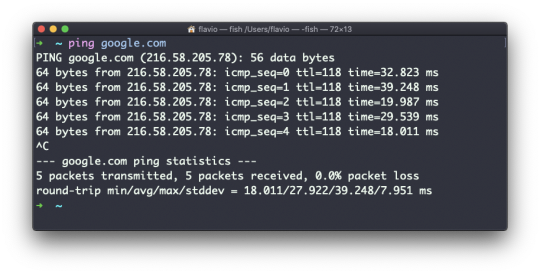
The command sends a request to the server, and the server returns a response.
ping keeps sending the request every second, by default. It will keep running until you stop it with ctrl-C, unless you pass the number of times you want to try with the -c option: ping -c 2 google.com.
Once ping is stopped, it will print some statistics about the results: the percentage of packages lost, and statistics about the network performance.
As you can see the screen prints the host IP address, and the time that it took to get the response back.
Not all servers support pinging, in case the request times out:
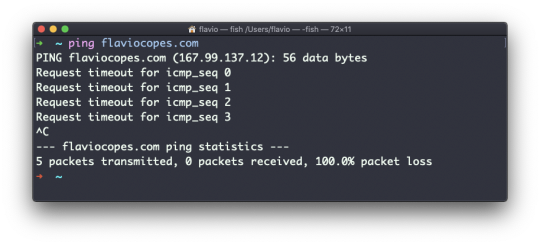
Sometimes this is done on purpose, to "hide" the server, or just to reduce the load. The ping packets can also be filtered by firewalls.
ping works using the ICMP protocol (Internet Control Message Protocol), a network layer protocol just like TCP or UDP.
The request sends a packet to the server with the ECHO_REQUEST message, and the server returns a ECHO_REPLY message. I won't go into details, but this is the basic concept.
Pinging a host is useful to know if the host is reachable (supposing it implements ping), and how distant it is in terms of how long it takes to get back to you.
Usually the nearer the server is geographically, the less time it will take to return back to you. Simple physical laws cause a longer distance to introduce more delay in the cables.
The traceroute command
When you try to reach a host on the Internet, you go through your home router. Then you reach your ISP network, which in turn goes through its own upstream network router, and so on, until you finally reach the host.
Have you ever wanted to know what steps your packets go through to do that?
The traceroute command is made for this.
You invoke
traceroute <host>
and it will (slowly) gather all the information while the packet travels.
In this example I tried reaching for my blog with traceroute flaviocopes.com:
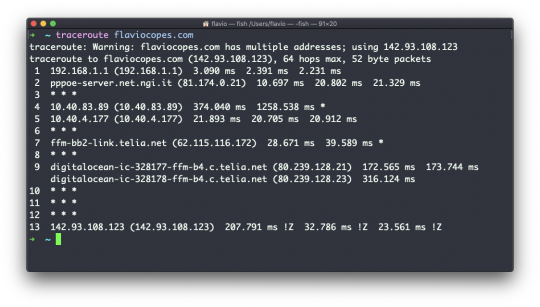
Not every router travelled returns us information. In this case, traceroute prints * * *. Otherwise, we can see the hostname, the IP address, and some performance indicator.
For every router we can see 3 samples, which means traceroute tries by default 3 times to get you a good indication of the time needed to reach it.
This is why it takes this long to execute traceroute compared to simply doing a ping to that host.
You can customize this number with the -q option:
traceroute -q 1 flaviocopes.com

The clear command
Type clear to clear all the previous commands that were run in the current terminal.
The screen will clear and you will just see the prompt at the top:
Note: this command has a handy shortcut: ctrl-L
Once you do that, you will lose access to scrolling to see the output of the previous commands entered.
So you might want to use clear -x instead, which still clears the screen, but lets you go back to see the previous work by scrolling up.
The history command
Every time you run a command, it's memorized in the history.
You can display all the history using:
history
This shows the history with numbers:
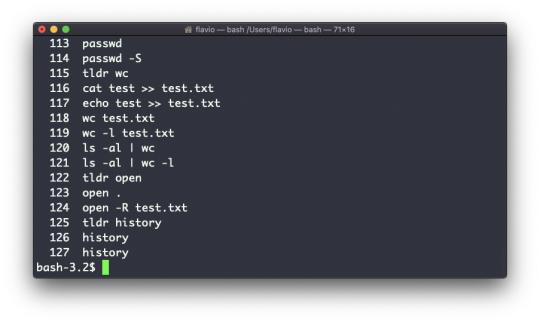
You can use the syntax !<command number> to repeat a command stored in the history. In the above example typing !121 will repeat the ls -al | wc -l command.
Typically the last 500 commands are stored in the history.
You can combine this with grep to find a command you ran:
history | grep docker

To clear the history, run history -c.
The export command
The export command is used to export variables to child processes.
What does this mean?
Suppose you have a variable TEST defined in this way:
TEST="test"
You can print its value using echo $TEST:
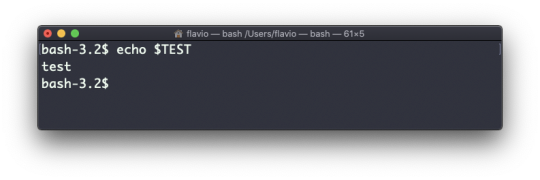
But if you try defining a Bash script in a file script.sh with the above command:
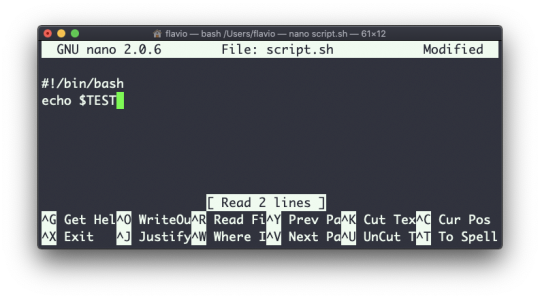
Then when you set chmod u+x script.sh and you execute this script with ./script.sh, the echo $TEST line will print nothing!
This is because in Bash the TEST variable was defined local to the shell. When executing a shell script or another command, a subshell is launched to execute it, which does not contain the current shell local variables.
To make the variable available there we need to define TEST not in this way:
TEST="test"
but in this way:
export TEST="test"
Try that, and running ./script.sh now should print "test":
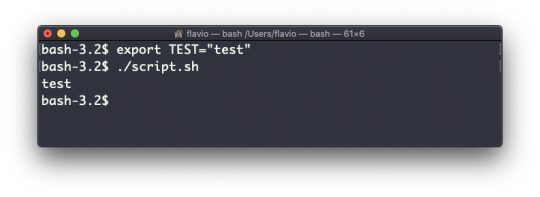
Sometimes you need to append something to a variable. It's often done with the PATH variable. You use this syntax:
export PATH=$PATH:/new/path
It's common to use export when you create new variables in this way. But you can also use it when you create variables in the .bash_profile or .bashrc configuration files with Bash, or in .zshenv with Zsh.
To remove a variable, use the -n option:
export -n TEST
Calling export without any option will list all the exported variables.
The crontab command
Cron jobs are jobs that are scheduled to run at specific intervals. You might have a command perform something every hour, or every day, or every 2 weeks. Or on weekends.
They are very powerful, especially when used on servers to perform maintenance and automations.
The crontab command is the entry point to work with cron jobs.
The first thing you can do is to explore which cron jobs are defined by you:
crontab -l
You might have none, like me:
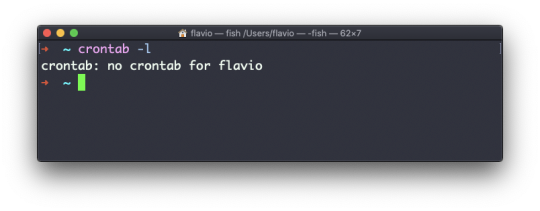
Run
crontab -e
to edit the cron jobs, and add new ones.
By default this opens with the default editor, which is usually vim. I like nano more. You can use this line to use a different editor:
EDITOR=nano crontab -e
Now you can add one line for each cron job.
The syntax to define cron jobs is kind of scary. This is why I usually use a website to help me generate it without errors: https://crontab-generator.org/
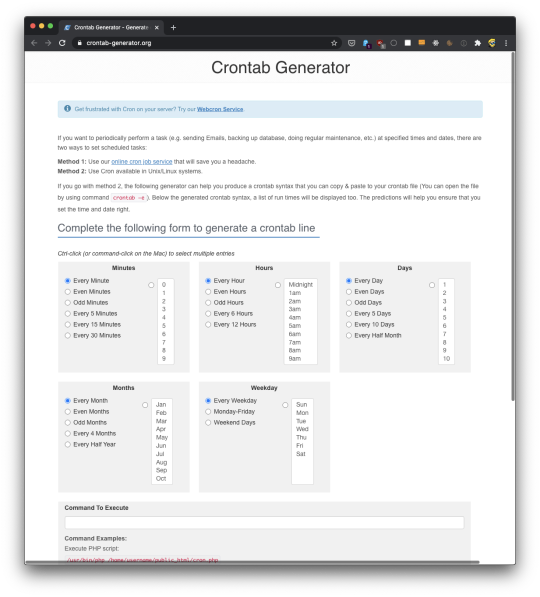
You pick a time interval for the cron job, and you type the command to execute.
I chose to run a script located in /Users/flavio/test.sh every 12 hours. This is the crontab line I need to run:
* */12 * * * /Users/flavio/test.sh >/dev/null 2>&1
I run crontab -e:
EDITOR=nano crontab -e
and I add that line, then I press ctrl-X and press y to save.
If all goes well, the cron job is set up:

Once this is done, you can see the list of active cron jobs by running:
crontab -l
You can remove a cron job running crontab -e again, removing the line and exiting the editor:
The uname command
Calling uname without any options will return the Operating System codename:

The m option shows the hardware name (x86_64 in this example) and the p option prints the processor architecture name (i386 in this example):
The s option prints the Operating System name. r prints the release, and v prints the version:
The n option prints the node network name:
The a option prints all the information available:
On macOS you can also use the sw_vers command to print more information about the macOS Operating System. Note that this differs from the Darwin (the Kernel) version, which above is 19.6.0.
Darwin is the name of the kernel of macOS. The kernel is the "core" of the Operating System, while the Operating System as a whole is called macOS. In Linux, Linux is the kernel, and GNU/Linux would be the Operating System name (although we all refer to it as "Linux").
The env command
The env command can be used to pass environment variables without setting them on the outer environment (the current shell).
Suppose you want to run a Node.js app and set the USER variable to it.
You can run
env USER=flavio node app.js
and the USER environment variable will be accessible from the Node.js app via the Node process.env interface.
You can also run the command clearing all the environment variables already set, using the -i option:
env -i node app.js
In this case you will get an error saying env: node: No such file or directory because the node command is not reachable, as the PATH variable used by the shell to look up commands in the common paths is unset.
So you need to pass the full path to the node program:
env -i /usr/local/bin/node app.js
Try with a simple app.js file with this content:
console.log(process.env.NAME) console.log(process.env.PATH)
You will see the output as
undefined undefined
You can pass an env variable:
env -i NAME=flavio node app.js
and the output will be
flavio undefined
Removing the -i option will make PATH available again inside the program:
The env command can also be used to print out all the environment variables. If run with no options:
env
it will return a list of the environment variables set, for example:
HOME=/Users/flavio LOGNAME=flavio PATH=/usr/local/bin:/usr/bin:/bin:/usr/sbin:/sbin:/Library/Apple/usr/bin PWD=/Users/flavio SHELL=/usr/local/bin/fish
You can also make a variable inaccessible inside the program you run, using the -u option. For example this code removes the HOME variable from the command environment:
env -u HOME node app.js
The printenv command
Here's a quick guide to the printenv command, used to print the values of environment variables
In any shell there are a good number of environment variables, set either by the system, or by your own shell scripts and configuration.
You can print them all to the terminal using the printenv command. The output will be something like this:
HOME=/Users/flavio LOGNAME=flavio PATH=/usr/local/bin:/usr/bin:/bin:/usr/sbin:/sbin:/Library/Apple/usr/bin PWD=/Users/flavio SHELL=/usr/local/bin/fish
with a few more lines, usually.
You can append a variable name as a parameter, to only show that variable value:
printenv PATH
Conclusion
Thanks a lot for reading this handbook.
I hope it will inspire you to learn more about Linux and its capabilities. It's evergreen knowledge that will not be out of date any time soon.
Remember that you can download this handbook in PDF / ePUB / Mobi format if you want!
I publish programming tutorials every day on my website flaviocopes.com if you want to check out more great content like this.
You can reach me on Twitter @flaviocopes.
1 note
·
View note